Building a Brothel

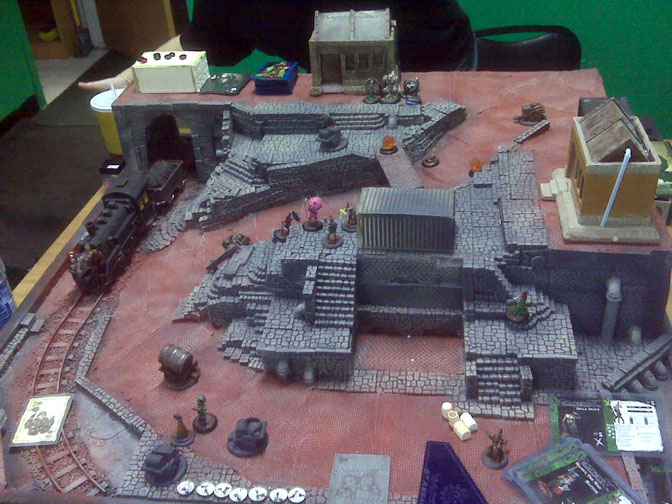
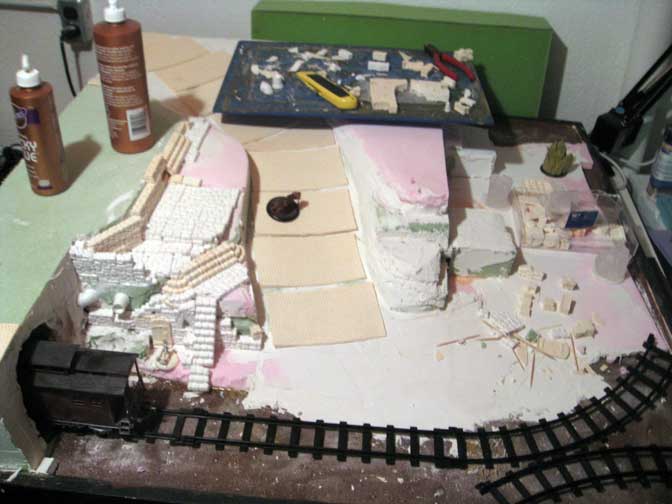
Malifaux – The downtown board I started a while back is looking pretty bare. Having found a little extra time I decided to revive this project and begin building the individual structures. Looking at the overhead view of the table, I've identified (5) sections that require structures to look complete.

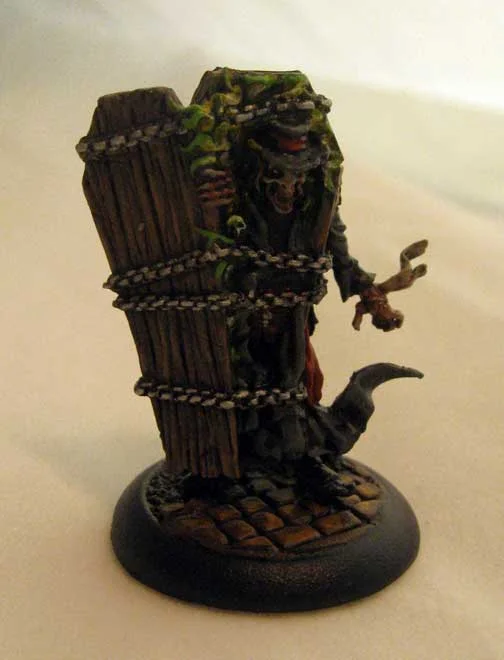
(A) Central multistory structure – This will be the brothel, I'm going to base this while section of town on the Red Chappel District so it makes sense for Seamus to have a safe house in the area. This building will cover the two levels of the board. I'm not going to detail the interiors, but will add some balconies for model interaction.

(B) City Block 1 – This with be several store fronts connected with a catwalk/balcony. I'll have an alleyway or two with stairs leading to the next level.

(C) Bridge – Will connect the two halves of the table to increase interactivity between the various areas.

(D) Dockside structures – Similar to the store fronts up top this will flesh out the lower street level. 

(E) City Block 2 – This with be several store fronts connected with a catwalk/balcony. I'll have an alleyway or two with stairs leading to the next level.

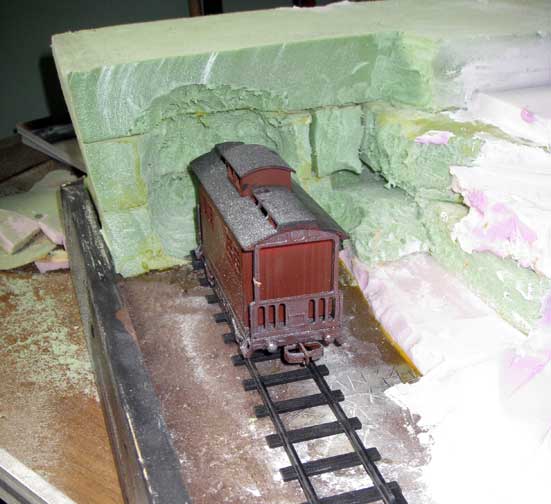
As the central structure is going to be a defining piece for this table I decided to start there. After taking measurements, I cut some gatorfoam to shape for the walls of the structure. Using some glue and pins I put together the walls, and dry fit it into place to be sure it fits snug into the gap. 

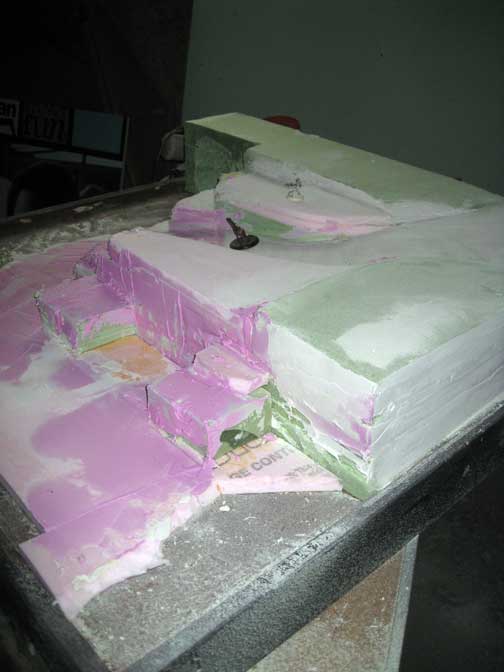
After the base structure drys it will be time to add some detailing. I like the idea of a Tudor style building mixed in with the look of the old Mordheim terrain. I happen to have a bunch of the corner pieces that will help add some additional texture to this structure.  The timber and plaster look will mesh well with some more modern looking brick and stone stuctures to indicate the rapid growth and renewal of Malifaux city proper. 

On the painting table ... Dead Men Walking

Malifaux – Continuing my Summer of Malifaux I've been pulling out some of my less used models to get them fully painted. Having just finished some Guild guard for my new demo crew I decided to paint up some Guild Autopsies. Most people find these to be far to situational to be included in most Resurectionist lists and the fact they don't drop Corpse Counters is disheartening.

However I find them to be flavorful additions to the game and particularly when setting up a story encounter they are fun to play. A decent ranged attacked can change the game and sometimes McMorning needs another gun around. (yes I know Desperate Mercs are cheaper and do a better job, but what about after you've killed them?). 

Essentially these were painted in the same way as the Guild Guard. The coats are Adeptus Battle Grey foundation, washed with black and highlight with a cool grey. The pants are painted crimson, washed with earthshade and baal red, then highlight with a bright red and a fluorescent any color red highlight. 

The skin was based with a pale flesh tone and washed with purple then highlighted with my special zombie skin mixture. I toned down the highlight with a light wash of ogryun flesh. After the final highlights I went in around the eyes and open wounds to add some red wash. 

In the Spirit World

I've decided to play each of the Resurectionist masters for several games in a row during the Dead Heat campaign to give each of them a chance to shine.

Given the stormy terrible weather and being slightly grumpy from being soaked, I decided to run Kirai. (nothing like matching the mood of your master, insert brooding sad face.) I was bit nervous as my opponent wanted to play a quick 25 stone game and Kirai is a little light on hitting power at that level. (unless the cards go your way).

Using the my Hell Dorado: Blood Falls board we decided to play a game in the Mines, and flipped Alone in the Dark (models that fail morale duels are killed). The strategy was Shared: Slaughter (sigh ... ). I announced Assassinate and Kirai's Master Specific. 

My List:

Kirai

(5) Seishin

Shikome

Spirit of Lost Love

Dave's List:

Rasputina

Convict Gunslinger

(2) Ice Gamin

Sabertooth Cerebus

Essence of Power

I won the initiative first turn and moved up a Seishin (repeat until he's done activating). Activating Kirai I cast in the Spirit World to move to a Seishin, then Swiriling Spirits the Shikome right in front of Rasputina (her prey). The Shikome activates and beats on Rasputina, causing him to burn through most of his stones trying to stop the damage. 

Turn two he wins the initiative and uses Raputina to take the Shikome down to 2 wounds (I hate overpower BTW), burning through the last of his stones in the process. I activate Kirai and Summon Ikyro, and another Shikome. Rasputina gets eliminated and the Cerebus eats a Seishin.

Turn three the gunslinger kills the wounded Shikome, and gets wounded by Ikyro. The other Shikome eats an Ice Gamin and Kirai heals up (with the help of the Spirit of Lost Love). 

I forgot to take notes on the last two turns but it came down to Kirai, Lost Love, (2) Seishin and another summoned Shikome versus the Gunslinger.  Once the Gunslinger was down to a single wound Kirai spirit worlded in a cut him down with the hedge clippers.

The game was pretty fun and Dave was pretty surprised at how mobile Kirai is. I got lucky drawing a decent Mask each turn as well as a Crow. In games where that doesn't happen it's unlikely that Kirai will be swooshing around the board as much or getting off the summons she needs.

On the painting table ... Lawmen

Malifaux – I've been going through my demo kit to be sure I have all the most up to date materials and realized I sold off all the Guild crews I typically demo with. Luckily I still have a Lady Justice crew as well as a nice contingent of Guild Guard. They are however not quite up to the standards of the Seamus Crew I like to use for demos so I needed to get painting. Finishing my Resurectionists is going to take a back seat for a minute.

While I've painted the Guild up in numerous colors in the past for commissions, for my personal crew I feel that the black, grey, red and brown scheme is going to be the best look. Since the Guild is a governmental body I decided to stick with a uniform look for all the models. (minor exception for the more characterful unique models). 

A good "first look" demo usually consists of a master and one or two minions. I prefer to run Seamus with a few Belles against Justice with some Death Marshalls. So they are the models I focused on finishing first. The models were already based coated and shaded when I got back to this project, however the color scheme didn't fit with my new direction. So I stripped them down and started over. 

The coats were all painted with Adeptus Battle Grey, I really like how the foundation paints work once they've been significantly thinned down. The pigment covers nicely and at the proper consistency it goes on smooth. The reds were all painted with a deep crimson I had mixed up for a Khorne army I painted as a commission last year. I really like this color as it shades well with Devlan Mud and when I apply my "any-color red" fluorescent highlight it looks pretty sweet.

Mid-way through my saturday of painting I ran out of Devlan mud and had to drive over to a local store that stocks GW paint. And unfortunately they didn't have any of the old like left so I picked up the new version, now called Earthshade Shade. It works pretty much the same although without the funky smell and a slightly browner hue.

For the bases I used a mix of Dragonforge Trench bases with the Wastland bases. I think the combination gives a nice badlands/ghost town feel. For the grass I used Army Painters grass tufts, these are really great as it gives you a nice clump of grass that is standing up and ready to apply. I never quite understood the process of static charges to make your own tufts, so dropping $5 for a pack with enough grass tufts to do a small army is well worth the price. I just wish they had a larger variety of colors available locally.

After a solid day of painting I was able to finish up Justice, The Judge, (3) Death Marshalls, (2) Guild Guard, The Executioner, and a Guild Austringer. The color scheme seems to work well and they look good as a group. I'm not sure they are bright enough to catch the eye of any painting judges but they look good on the tabletop.

Tuesday Throwdowns – Malifaux Demo Nights

Malifaux – The first Tuesday Throwdown at Gamer's Gauntlet went well. I think the store was surprised at the turn-out. We had six players actively playing as well as a decent number of on-lookers who were interested in learning more about the game.

I brought two tables with me to the event, my Swamp Board and the Qi & Gong Tavern. Having both an indoor location and an outdoor location is healpful for demo nights as it show off the variety and story driven aspect of the game. Next week I'm going to need to bring more tables as the Warmachine terrain doesn't quite fill the tables enough for Malifaux.

The highlight of my games for the night was a quick 25 stone game against Lilith, in which she took Seamus down to one wound, I popped Killjoy next to Lilith to take her down to one wound, forgetting about Black Blood and killing Seamus in the process. Luckily a Necropunk was able to Leap in and deal that last wound to Lilith. 

A Bit Rusty - Rigor Mortis Perhaps?

A Bit Rusty - Rigor Mortis Perhaps?

Getting in my first game of the Dead Heat campaign, I made the trek down to RIW hobbies in Livonia. I brought along my swamp board and realized it wasn't really the best fit for the locations of the campaign. Going over the map my opponent (Ben) and I chose to play in location (15) Southern Docks District. It seems like this would be the closest fit for the swamp board i had with me.

Read More

On the painting table ...

Malifaux – As I'm super excited about the World Wide - Dead Heat campaign, I've decided to switch up my projects and focus on finishing my Malifaux factions. Digging through my boxes I came across a Dead Rider and Night Terrors that I never took out of the box. When book 4 first came out I was a huge fan of the Night Terrors and proxied them with some old GW bats. After I while I stopped using them and had forgot I even had the models. The Dead Rider isn't really a model I find super useful however it looks cool so I need to paint it up and try to find a niche for it.

Putting the models together I found some of the gaps to be to noticeable for my liking, particularly where the wings join the body on the Night Terrors. Using a little green stuff I sculpted some fur to better hide the joins. The rock formations the models attach to the base with are a little weird so it took some work to get them to blend into the cobblestone bases I'm using for all my Resurectionist models. I think with the right colors the rock outcrops could appear to be broken masonry or statues. 

After a quick base coat and simple wash the models are on their way to being tabletop ready. Next step is to flesh out the details and finish them.

Summer of Malifaux – World Wide Campaign

Malifaux – Details were released today for a World Wide Summer Campaign - Dead Heat. I'm looking forward to this as I fondly remember campaigns from other systems. Not only does it get the community on the same page but it also encourages playing a ton of games with a set goal and potential reward.

I'm hoping to get a pretty significant group of players participating in the event all summer long. I'll continue to post updates as they happen.

It looks like each area is going to be worth a point value which will effect the campaign results. As posted on the Wyrd Forum here.

There also appears to be quite a bit of coordination with several podcasts to provide updates.

Special Guest Painter

Malifaux – Today I'd like to take a moment to share my daughter's WIP Collette Crew for Malifaux. After reading through Book 2 she insisted on getting the showgirls to paint, not only did she like the back story but she also really liked the models. Of course not wanting to discourage any interest in gaming I picked them up for her.

After I assembled and primed them (she's 12 and slightly accident prone so x-acto blades are out of the question right now), she set to work picking out a color pallet for her crew. This time around she really wanted my opinion and suggestions on technique, which was a proud moment for me to be able to share the secrets of a washing and highlighting with her. 

So far I think the crew is looking really good and I'm impressed with the color choices she made, as I never would have thought to go in that direction.

On the painting table ...

After a several month hiatus I was able to get my painting table set back up again. Although I have several projects in various states of completion I wanted to start fresh with a few models that have been waiting in the wings for a long time.

Currently I'm reading The Gildar Rift, which is a Warhammer 40K novel that deals with the Tyrant of Badab, Huron Blackheart. I'm enjoying the book and have always liked that character, and if the rumours on the internet are to be believed we might get a Chaos Book worth playing later this year. So I dug through my collection of unpainted 40K models to find Huron Blackheart and Lucious the Eternal. Both models I picked up prior to the Finecast mess, so they're still metal.

I began with putting down some base colors and washing the entire model. I've found with character models like this with so much detail it helps me to be able to pick out what's going on with the model. For example, the Blackheart model has a ton of "combat damage" and strange breaks in the armor as well as tons of odd pipes and cables. By washing over the model with the basic tone I can see more clearly what things are. This is particularly helpful in picking out the details on the model. After doing this however I realized he's missing his thumb, hopefully I'll be able to find it or a suitable replacement so I can continue with the model.

Determined to actually get some painting done the next model I pulled out was Lucious the Eternal. I began with a hot pink base coat and washed the entire model with purple. As the wash was drying I realized why I never bothered to paint this model. He was my favorite character in the third edition book and I had built my own version. When this was released I picked it up right away, put it together primed it and put it back in the box. The model is just plain ugly. The whip points straight out there's no implied motion, and the whole thing feels bulky and fat.

Dismayed by my luck so far, I put together and primed Troll Potion. This is a special CMON model that I plan to use as a Desperate Merc for Malifaux. The model is all one piece with minimal flash, so clean-up was breeze. After the primer had dried I went about blocking in my base colors. I'm a big fan of green and black, and try to work this into most of the models I use with my Resserectionist forces. Being as I'll probably use her with Seamus I went with red hair and pale skin. 

Given the obstacles and set-up time I'm pretty happy with the progress I was able to make back at the table again. Hopefully the next session will go a bit smoother and I'll have real progress to show.


On the painting table ...

Malifaux – After trying a few games with a single Dead Doxy I decided they would work better as a pair. Currently I have the Dead Justice as one and I've "converted" Collete to act as my second Doxy. 

To "convert" the Collete I didn't really want to do much as I really like the model. So I did a few minor alterations to the model, I drilled a bullet hole in her back with a pin vice and added a nasty gouge on her leg. Minor thing like this will add to the effect I hope to create with paint. I also twisted her arm and adjusted to hand to be holding a skull and spine. This seemed to be in line with a "magic trick" Seamus would like.

To paint I've been using the same technique as the other zombies I've been working on. A thinned down GX foundation base followed by a wash and highlights gets the models to tabletop quality quickly. From there I will add detail and smooth the transitions as time permits. My goal with any model I use in game is to get paint on it before I used it. While I might not actually finish the model for quite some time at least I have something that looks passable on the table rather than primer grey or bare metal.

Downtown Malifaux (Test Drive)

Malifaux – I had a chance to test drive this board Tuesday night at RIW. My first impression is that it needs more stuff. I have to create buildings designed to fit on the board, as generic stuff doesn't quite fit right or block enough. The stairs worked fine as most models could move up or down them with a single walk action.

Choosing your deployment area is a big deal with this board as some crews are going to benefit from having the high ground. I don't see this as an issue as choosing a deployment zone should be a very important part of any game. Speaking of high ground, I don't think there is enough yet once the other buildings are added with balconies and scafolding  I think it will approach what my vision is for the city.

On a related note we had a visitor from the UK stop by for our Tuesday Tussles at RIW in Livonia MI. It was nice to meet a Henchman(Clousseau from the Wyrd boards) from across the pond and pick his brain about how events work in the UK. 


Downtown Malifaux (part five)

Malifaux – The base is almost finished. As it turns out much like most projects this is far more work than I anticipated. Between casting the "right" pieces and getting them to fit the layout I've spent many night with my hands covered in glue plaster and resin. However the light at the end of the proverbial tunnel is approaching and the basic construction is almost done.

While the resin casts of street sections was a great idea and saved me a ton of time, there are some nasty gabs that need to be filled. If I kept this simple and did a flat board the gaps wouldn't be much of an issue, of course I had to be "creative" and do something fancy. To solve the gap problem I'm using milliput and my trusty brass rod to texture it. The gray putty I picked up seemed to be extraordianrily hard to mix, but I found a little water helps to ease that problem. It's also helpful to smooth out the rolls of gray-stuff between the cracks. The transitions don't look as great as the pieces I cast but once they're painted you shouldn't be able to notice the difference.

I picked up some course ballast for the train tracks and attached them to the board with tacky glue. Because the track is part of a train set I had to cut away the join tabs to make it more realistic looking. Once that dries I'll finish the details on the other side of the tracks and be able to move on to painting.

One the painting table ... Avatar of something like that

Malifaux – I finally have the two Avatars I picked up assembled and base coated. I really like the Seamus model and the flash line weren't anywhere near as bad as they were on Snowstorm. I hope this is a sign that quality control with resin minis is improving. 

I was happy to see that Kirai was still all metal, however getting her together was a pain. It looks like the robe of Ikyro and the prone Kirai are supposed to join tightly together to give the impression one is coming out of the other. No matter what I tried I couldn't get them to match up right. so I placed Ikyro off to one side and used green stuff to blend the robe into the base. I think I like how this looks better than the models I've seen assembled "correctly."

Still not sure how much I'll like them in the game, but the idea of hulking out mid game is pretty cool.

I've also done some more work to my Alternate Seamus. I removed the "wimpy" flintlock and replaced it with one of the shotgun-type weapons in the Hats and Guns pack. I think this change really reinforces the homage to Evil Dead and more people will get it.

One the painting table ...

Malifaux? – Recently I picked up Scuttlebones, Undead Crab from Reaper Miniatures. This is a pretty odd miniature, which doesn't really seem to fit in Malifaux (probably why they don't have one ... duh). I however really thought this was something cool I'd like to paint so I picked it up. 

Assembling the thing is a giant pain, as is to be expected with anything that has a bunch of small spindly legs. The main body comes in two pieces which go together easily. Attaching the legs not so much. After drilling our the leg joins and scraping down the ball joints I was able to wedge the leg into the holes to create a pretty strong join. The claws suffer from the same issue but after a bit of work I got them to fit. 

I mounted the crab to one of my Skull bases and was able to position it so almost every leg attaches to the base. I like how the pose turned out as it looks like it's scuttling over the rocks.

After the primer dried I base coated it with Foundation Orange followed by several coats of Ball Red Wash. This gives it a nice red-orange color. I them painted the highlights and toned the whole thing down with a light wash of Devlan Mud. 

For the base I decided to paint it a rich earthy color like Bayou Mud. A bit of static grass and water effect and it's almost done.

Not sure what I'm going to do with it, maybe I'll give it to Breadcrab to use as a Rogue Necromancy. He seems to has a seafood fetish and just started playing Ressurectionists. 

Red Chapel District (Downtown Malifaux Part 3)

Malifaux – Having cast up my road sections and some brick wall section I've begun the time intensive portion of this project. I probably would have better luck if I made my road sections with notches to fit together like a jigsaw puzzle. However I didn't and am going to have some serious gaps to fill in. I think ultimately this is going to strengthen the entire project (as well as subtlety add no slip areas).

While waiting for the resin to set I decided to begin adding blocks to the board. I like the idea of a city built on a city on a city, which according to the fluff so far seems to be the case. The newer areas are built from renovated old buildings or simply built on top of the existing structures. I imagine it to be like Jerusalem or another ancient settlement in which multiple cultures have occupied the same area over the course of centuries. 

With that in mind I began adding flagstones and fieldstone walls to one area. The fieldstone is going to represent the older structures and or buildings cobbled together from existing material. I'm going to use the gothic stones for new structures like the train tunnel and bridges. Hopefully I'll be able to make these work together and not look like a jumbled mess.

The first area I've been working on is the stairway along the main street. As this leads down near the tracks I wanted to create a maintenance room. This could lead down to the sewer or just serve as an area for rail workers to rest. I imagine small rooms like this throughout the city hidden in forgotten places server as hideouts for near-do-wells, the poor and forgotten or laborers. 

I've also decided that the buildings will not be permanently affixed to the board. Dragging it back and forth from my garage to basement (for sanding etc) I learned that I can't go much higher with the board and still be able to go up my narrow stairwell. I'm really glad I didn't block in the buildings before learning this. So now my focus is to build the basic board and texture it appropriately. This will allow me to swap out buildings and build a ruined version of them to represent the Slums and Quarantine Zone as well.

Choo Choo Catchu ... Tunnel of Love

Malifaux - Having sanded down the rough shape of the downtown streets, it's time to work on the actual plan and making it work. I want to add the train (which is still unfinished...) that I was working on for a possible Breach location (lost interest in that project ... for now) to this project. As I fleshed in the rough shape of the mountain/hill I left an area for a tunnel. 

To build the tunnel I'm using the Hirst Arts gothic bridge mold. This mold can create a nice arch which will serve as the tunnel opening. 

Before I can build the tunnel however I need to blast out the interior. So out comes the trusty dremel to bore out the tunnel from the green foam block. You're probably wondering why I didn't just cut the arch out of the foam before I glued it into place. Well there are two good reasons: 1. I'm trying to create this board in a somewhat organic way so that it feels more like the city filled in around the existing terrain (in other words I didn't have a solid plan and got impatient) 2. By building a solid block to begin with it should in theory be stronger than if I had cut a glued an empty arch into place.

The question that come up next is do I bore al the way through to the other side or do I make it a faux tunnel that isn't functional. As the "bridge" over top is about 6" wide I don't think making the tunnel functional is going to have much effect on game play as it's to wide to comfortably move models under. However if it goes all the way through there is the coolness factor of having the train coming through the tunnel.

Ultimately coolness wins out. My initial though was to smooth and finish the sides of the board edge to match the black base, but I think it's potential more of an enjoyable experience to see the edge of the board as rough earth. Maybe...

Downtown Malifaux - Stage 2

Malifaux – I'm getting ready to move into stage two of my downtown board. I still have several other items that I'm going to need to cast and/or sculpt but I'm getting antsy to start the larger portion of the project. 

Because this is going to be a fixed terrain board I need to do some prior planning before moving ahead with it. A few rough sketches give me the general idea of how I want the board to lay out. I'm not going to go into detail with the buildings at this point because I'm more of a hands on visualizer.

I have a base board that I built previously, I was never really happy with the way it turned out so rather than build a new base I'm going to reuse this one (much like a painter with a canvas). Step one is to build up the elevations to fit what I'm envisioning.

The goal is to have a gently sloping winding road traversing the center of the board. One side of the board will be a higher elevation than the other and I want to work a railroad tunnel into that side of the board as well. The far side of the board will be at ground level with a number of staircase in the alleyways. 

The trick is going to be fitting everything I want on the board while maintaining playability. I'm not sure if finishing the building interiors is going to work or not. While I'd love to detail out each structure interior it seems like it may make the board more difficult to use. From past experience lifting a level makes things shift and slide. 


Downtown Malifaux - Stage One ... Revisited

Malifaux – So I came to the realization I suck at using a rolling pin. After several attempts I've broken down and bought a "craft" pasta machine. Luckily as was able to pick it up for 40% off retail and I think I'm going to get quite a bit of use out of this tool.

While I was at the craft store I also picked up a brick of sculpty to try out with the machine. I'm a little nervous that milliput or greenstuff will get stuck in the machine. 

Working the machine is simple enough you set how thick you want the clay, stick a blob on top and turn the crank. Voila perfectly uniform flat clay. Of course there's a bit more to it than that but the basic idea is that simple.

So now that I can produce uniform flat sheets of clay it's time to go back to the drawing board and create the cobblestone sheets. I used the same technique as before, bent pipes to create the bricks. Patience is key as if you screw up the pattern you'll wind up starting over from scratch. After two tries, I slowed down and got the results I wanted.

After baking the clay for 15 min. it's ready to mold. Well, almost ... the baking/cooling process caused the edges to curl slightly. So I stored the dry baked sheets under a stack of old text books for a few days to eliminate the curl. 

Next the master for the mold must be glued down to the casting box to prevent it from floating up during the molding process. Because this is a large flat surface area the odds are it will float in the silicone mixture so to save myself from that potential headache I'm going to be sure to glue this down to a sheet of plasticard the exact size of my mold box (a 5x7 acrylic box frame)


Downtown Malifaux - Stage One

Malifaux – After this year's family vacation I have a boatload of inspiration images for the next big project I'm going to do. My goal is to build a super detailed fixed board based on the town of Eureaka Springs, AK. During my visit to the town I was really impressed with the cramped vertical feel of the town. I think it will make for an interesting game board. I've been leery of doing a fixed terrain board since the tend to get boring after a while. However I think I'll only bring this one out for special events or con demos. 

This time around I'm going to plan ahead and build all the individual components before I begin.  I want the cobblestone to match the bases I've used for my Ressurectionist forces, so first things first I need a way to create lots of cobblestones that can be used for the street. Having learned my lesson with the sewer board, I ruled out cutting individual stones. The process was far to time consuming and won't give me exactly the look I want.

So off to the craft store. After looking around at various options that might work I settled on some brass tubing. The tube is of course a tube, so I had to carefully bend it into a rectangular shape. I did this with two different size tubes so I could create some variety in the pattern. 

I then mixed up some miliput (apoxy sculpt might be a better choice but this was 40% off) and roll it out into a large smooth flat area. Once that's done it's a simple matter of taking the tube and pressing the pattern. Repeat until the area is covered.

This didn't work out as well as I had hoped so before I move on I need to research a better way to flatten the putty. I think a clay roller might work ... unless we have a pasta maker lying around.

Once I solve the flatness issue, the next step will be to cut this into squares (or a large section) and make a mold. This will allow me to quickly duplicate the process to cover the streets. I'll also create some optional pieces to create more interest like man-hole covers and grates.