
Now Entering the Third Dimension
/


Super Dungeon Explore – Over the weekend I had a day to myself and had planned on doing some more work on the library board I've been slowly making progress on. Well after cutting some blocks of foam to add some rooms/higher levels to the board, gamer ADD kicked in.
Rather than finish a project I got distracted by the pile of Super Dungeon Explore minis left out from a game earlier in the week. The minis are so nice looking I began to lament the flat tiles the came with the game. Don't get me wrong the tiles are beautiful and serve their purpose just fine. But they feel more like the homely girlfriend and these minis deserve a prom queen.
To begin I made a trip up to Home Depot to pick up supplies. I want to keep this small and cheap so I picked up a 4'x8' sheet of 1/2" pink foam, a few rolls of cork contact paper and a large snap off razor knife. Once I had the sheet cut down to fit in my car I made the track back home and started work.
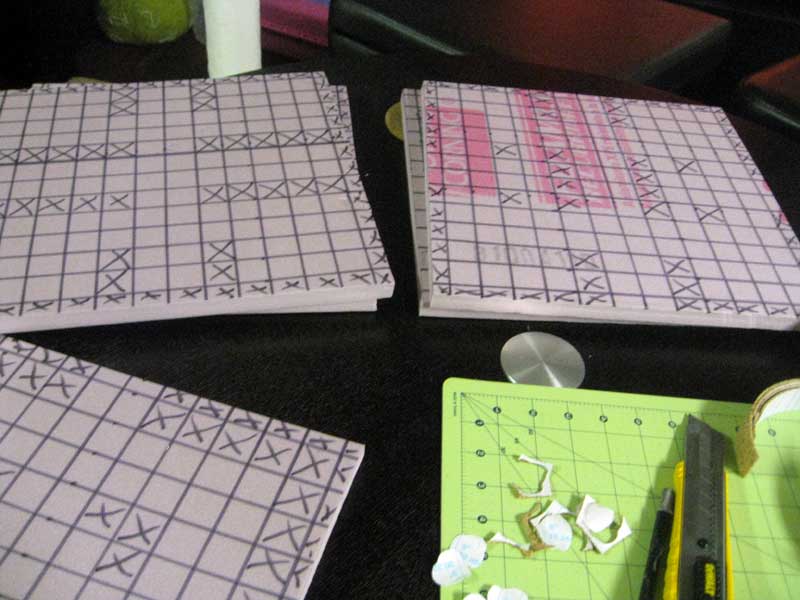
I measured out my tiles to be 13"x13" this gave a nice 1/2" border around each tile to add some walls. With my trusty sharpie I then went about drawing the grid. After I gridded out 5 tiles I then marked them up to match the existing tiles. I stuck with the non lava side of the board for my first set. (Yes I'm probably going to make a boatload of panels, considering how easy these were to make.)
After marking them up I went about cutting the cork into flagstones. This was a tedious process but I'm happy I picked up self adhesive cork, gluing would have added a ton more time to this project. After cutting 1" strips I used a pair of scissors to cut random shapes from the cork. Essentially they're all roundish and fill roughly 1" of space. I stuck these down and repeated the process for all five tiles. (Note if you're going to spend a few hours cutting little cork tiles invest in a comfortable pair of scissors, the tiny pair used made my thumb really sore.)
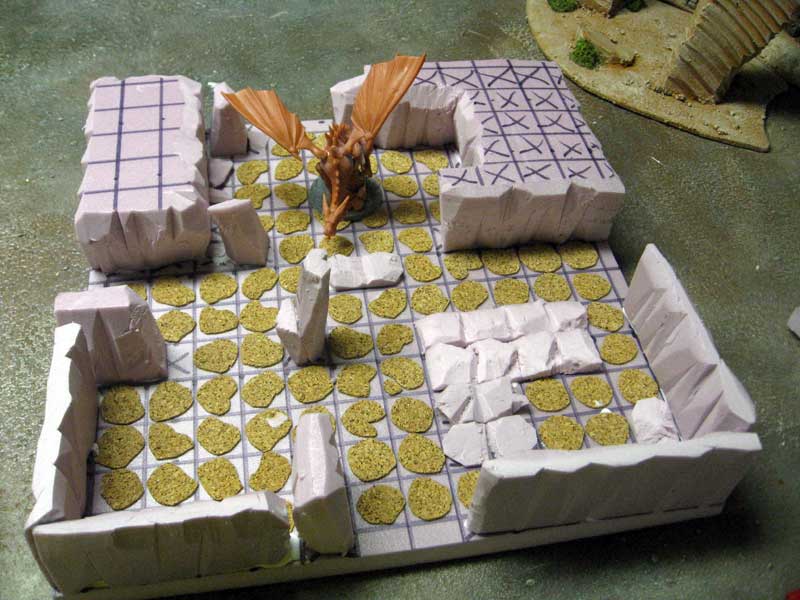
The next stage was carving the walls. Typically I use a hotwire cutter when making rocks or other pieces from foam. However for this project I wanted a specific look and opted to carve the foam with a knife. I invested in a heavy duty razor knife with snap off blades. This made the project really easy to carve as the blade passed through each block of foam smoothly. (Also through my index finger, but hey that's what glue is for.) I was quite proud of myself for measuring everything twice as it meant not mistakes on this project and no double work. In the end I spent a Saturday afternoon and evening carving and glueing down foam walls and now have 5 five tiles of 3D Super Dungeon Goodness. Next up is texturing and painting as well as adding some details but the project came together really quick and I'm happy with the results so far.


