Waterfalls ... stick to the lakes you're used to

Helldorado – Painting is almost wrapped up on my Hell board. I dry brushed the the whole thing with a lighter grey and tan. After that dried I used a water-based wood stain to shade the entire piece. The woodstain is cheaper than using inks or washes and gives a similar effect. To apply the stain I stipple it over the entire board, while it's still wet I take a rag and gently wipe off the stain. Paying particular attention to the edges and areas that would be worn to remove as much of the stain as possible.

Now that that's done, it's time to get started on the water effects. This is going to be the trickiest part of the process as I've never built a waterfall and the techniques I've found online all use different products.

I picked up a Scenarama water kit to see how they recommend building the waterfall. The kit is a bit pricey for what you get but I used a 40% off coupon at the craft store to get it for a more reasonable cost. It comes with some glossy water (which I assume is little more than a thick gloss paint) as well as a thicker paste that dries clear for texturing the water. They include a sheet of wax paper to build the waterfall with the thicker paste. After it dries you peel it off and attach to the area where the fall will go. 

I'm a little leary of this process as I don't think it's going to give me the effect I'm looking for. However since I have it and you create everything separate I'm going to give it a try.

The other option I've found uses clear acrylic caulk. Basically you follow the same process as the Scenarama kit, use wax paper or another nonstick material to build your fall and then attach it after it has dried. It seems like this might be the more durable choice, so I'll also be trying this method.

For the other areas I'll be using Envirotex light. While this is a costly material, I've had plenty of experience using it and feel confident that it will work for what I need it to. I think I'll be doing two pours of the epoxy, one to create a base for the water and a second after I've attached the falls. The tricky part is building up the pools where it will go to prevent them from running and flowing everywhere. To prevent this from happening I've used caulk to build up a lip, hopefully this will keep it where I want it to stay.

Caulk ... messy necessity

Helldorado – After checking a filling any odd gaps I found after putting some primer on my Hell Table, I'm ready to move onto to phase 2. I have a frame that fits around the board and need to create a seal that not only attaches the frame permanently but also creates a seamless seal. I decided to use Alex painters caulk, this is an acrylic product that cleans up with soap and water and is paintable. After attaching the frame I ran a bead of caulk along the seams and smoothed it with a wet rag.

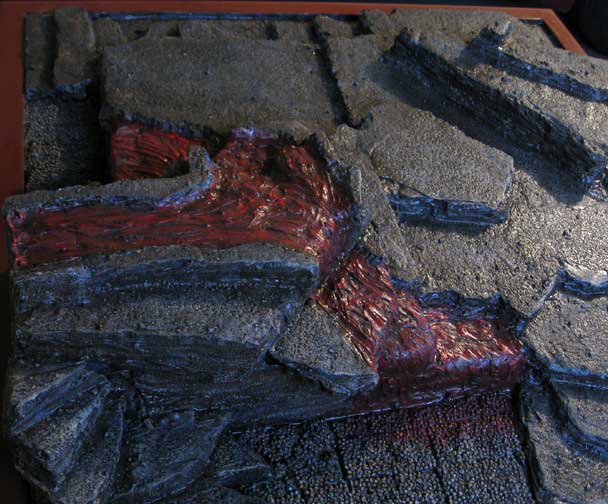
While I had a tube of caulk open I also decided to work on the waterfall. From previous experience with water effects, it's VERY important to seal the area that the water will go on. I like to use caulk as it's cheap, fills the space and is somewhat sculptable. Basically I put the caulk on the table in the area that the water will go, and than take my finger and smooth it out. Once the area is covered I go back and use a tool to create swirls and flow patterns in the caulk. This will limit the amount of water effect you have to pour to fill the area. 

Once the caulk is dry it can be painted just like the rest of the board. To get the best effect out of Envirotex Light you need to create depth by painting the deeper areas darker. By mixing some ink with the water effects you'll be able to create even more depth.

Building Hell

Hell Dorado – I've begun work on a board for Hell Dorado. After looking online for some examples of what the terrain should look like and searching for the terrain rules that should be in the english book if it's ever released, I came up with a plan. Well not really a plan but more of a general idea. This is going to be the first fixed terrain board I've done in a while and I want to be sure it's versatile enough to remain fun to play on while looking cool and incorporating some really dramatic fixed elements.

I had a piece of sintra with a frame that I salvaged from a graphic project that fell through. Luckily for me the piece I have is exactly 3' x 3' with a nice frame that goes around the edge. Also in my box of scrap I had a ton of 3" foam pieces left over from various projects. To begin I just randomly snapped the scraps into chunks and began placing them on the board. Once I had a general shape I used wood glue to secure them into place.

After letting it dry I added a few more pieces to smooth out transitions and create playable space. Once those sections were dry I took a dremel and began sculpting the rocks. This was a time intensive process and I was sure to have a figure on a 30mm and 40mm base on hand to be sure they would fit and be able to stand on the rocky sections. After finishing the carving I realized that the largest peak could accommodate a waterfall. After a bit more sanding I had created the basic shape of the river. 

The next step was to add some more texture to the flat areas. I began by roughly tearing sections of textured wallpaper to fit on the flat sections of the board. I secured these using wood glue. To transition from the wallpaper sections to the rocky crags I applied wood glue and sprinkled a mixture of sand a litter to create a rough texture. The trick to getting this right is to apply thin coats of glue and allow the sand to dry. Repeat until you've built up the desired thickness of debris.

Where the waterfall empties I'm creating a bed of skulls. Nothing says hell more than a river of blood and skulls. Using the mold I created for my bases I cast a whole bunch of skulls. Securing them to the board with tacky glue in all the areas that I plan to coat with water effect.

I've also taken the skulls and placed them in various nooks and cranies through out the board. I think small details like this really bring a piece to life.

I need to double check the bed of the water fall to be sure it's sealed properly so the water doesn't pour all over the place when I apply it. Ideally this needs to be done prior to painting. To paint I'm going to get some house paint mixed to match the grey I've used on the bases of my models. I've found the best paint has primer built into it so it adheres better. Painting on a thick primer and then applying paint causes some of the details to be obscured so I prefer to use an all-in-one.