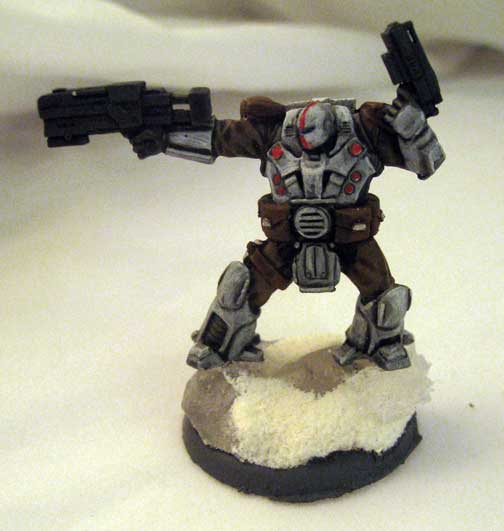
On the painting table ... USCR

MERCS – The next Megacon I've decided to tackle is the USCR. From what I've seen of them on the table I'm not sure they fit my playstyle but with a small scale game like this it's helpful to have extra factions around. Most people I've played a few games with either really like the system or hate it. A good chunk of them don't want to invest in yet another mini game so having somthing for them to borrow means more nights that my group will play MERCS or at least consider it for the rotation.

Assembling these models was fairly simple as most of them are one solid piece. The mold line fall in an odd place on the "kicking guy" and were tricky to scrape/file off. Otherwise I didn't have any major issues with the models. As I plan on mounting them to clear bases I lightly glued them to the slotta bases they came with for priming and painting.

I like the look of the studio models so I decided to mimic that paint scheme. The cloth portions of the models were based with khaki, the pouches all with a bright brown and the armor with a light grey. After a quick wash of black on the grey areas I had a better idea of where the highlights would need to go. While the wash dried I worked on mixing up a white color using a light grey base, titanium white, some blending medium and water. This works well when I want to paint in layers as I can slowly build up to the final color with minimal additional shading.

After getting the majority of the paint work done I clipped the models off the tabs and pinned them onto my Rock Bases. This set was cast using clear resin like the Ice Pillars I've done in the past. Mixing some snow flock, white paint, tacky glue and a little water I created a paste that looks like snow. After applying it to the base I covered it with loose snowflock and let it dry overnight. After dusting it off you have a pretty convincing looking snow cover.

I'm trying to track down some star transfers to finish these off as I really don't like freehand symbol painting if I can avoid it.

Spirited Away

Malifaux – Earlier this month I participated in a Malifaux Tournament and won "Best Sportmanship" which was pretty cool as I don't often get to participate as I'm usually running the events locally. I think I came in around 4th overall and had a blast. The prize was my choice of any of the small boxes, so I chose Snow Storm.

I really like the look of the model and I think it could potentially add quite a bit to my Kirai crew. Creating Ice Pillars, pushing models and providing a much needed tank are just a few of the options I see using the model. Eventually I might break down I pick up a 'tina crew of my own but right now I'm happy to add the Graverobbing (really why not a single ability deals with corpses?) Spirit of Chill to my Three Kingdoms Spirits.

Opening up the kit the first thing I noticed is it is a hybrid kit consisting of the large model in resin and the antlers and child as metal parts. Looking at the resin I'm starting to think the material is prone to issues (excessive flash, nasty mold lines etc) and it might just be an industry wide issue. Some of the mold lines on the legs are really deep, almost like the mold wasn't aligned properly and the fur along the arms and head has some weird flash that requires a bit of patience to remove.

After cleaning up the kit I pinned everything in place. I stuck both models on a temporary base to paint them. At the same time I cast up a clear base to mount them to. [TIP: Urethane Resin hates humidity, if you're having issues with excessive bubbling buy a dehumidifier.] 

I really don't like the two-tone studio paint job so I decided to stick with a monochromatic scheme for my Snowstorm. Luckily I had quite a bit of the custom colors I mixed for my Legion of Everblight models left over. I started with a baby blue base, followed by a blue wash. Next step was to lighten the flesh until I got the cold ghostly feel I was looking for. The child was painted similarly to the way I painted Rasputina a few posts back.

Overall I'm happy with my progress so far and will add some snow to the base to tie it all together.


It's getting cold in here.

Malifaux – Over the weekend I received another commission for a Rasputina crew (Oddly enough this is the first 'tina set I've painted). My client had no preference on the color scheme so I decided to go the traditional white and blue route. 

With the painted Ice Pillars I make, I've perfected my preferred method of painting ice. I use a bright baby blue as a base and shade it with a dark blue wash. From there I drybrush the baby blue, followed by a dove gray and finally white. The same method works well on the Ice Golem and Gamin, however it does require going in and painting highlights and smoothing out the shading. I used a similar method to basecoat Rasputina, and them worked out the details to bring her up to the appropriate painting standard.

I decided to used the Clear Ice Bases to base the crew. Rather than attaching the models prior to painting I prepared them on a separate base and attached them after they were finished. Clear resin can be tricky as tiny imperfections in the mold give it a slightly cloudy appearance. I've found coating the base with a gloss varnish clears up the cloudiness and gives it a wet look the feels like ice. After that's done I paint the edge of the base with a gloss black which seems to adhere better to the clear resin than a flat finish. 

After pinning and glueing the models into place, it's time to add the snow effect. I mix one part snow flock, one part tacky glue and one part white paint to create a paste. Carefully apply it to the base where you want snow. I then bury the whole base in snow flock and let it dry over night. Once it's dry I gently brush off the snow flock and seal the model with a matte sealant. If the ice loses it's sheen simply reapply the gloss varnish where needed.