Deadbolt's Derelict – Getting Ready for Necromunda
/


Warhammer 40,000 – Necromunda used to be one of my favorite games. Sadly the awesomeness the is 8th Edition Warhammer 40,000 has overshadowed the game in my local group. Combined with the "lack of rules" for older gangs it's been a hard sell. However once we wrap up our current escalation league I plan on doing a short Necromunda campaign.
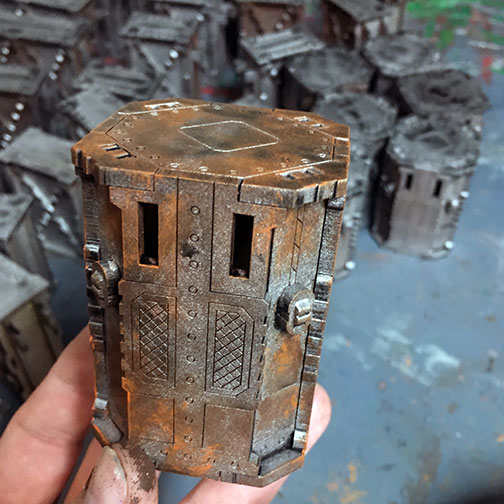
In preparation I picked up a laser cut mdf kit from Death Ray Designs. This kit is very clever in the simple way you assemble the components. Once together the different sections slot into one another to lock in place and create a very solid piece of terrain that can be broken down and easily stored. (Something unfortunately that isn't so easy with my Bug Hunt Corridor set.) The other benefit to this system is the ease in which you can paint it. Since it's essentially a bunch of blocks you can do most of the work with spray cans before going in to address the details. Of course you do need to have the cardboard tiles from Necromunda or at least a mat for the base.

After putting them together and stacking the various components I realized that it will work well with my other industrial terrain to create a claustrophobic board that limits shooting.

To paint these I started with a rusty metal primer, followed by aged copper and silver spray paint. Once that dried I washed all the parts with Miniwax Waterbased Onyx stain. After the stain dried overnight I applied burnt umber paint liberally with a sponge. This is the first step to applying a rusty metal effect. Once the umber has dried I dry brushed Ryza Rust on the most exposed pieces. I typically avoid using GW paints on terrain, however the technical paints aren't always easily replicated with craft or house paint so I sucked it up for this project.

For the lights on the corners I based them with a bright yellow, which I plan to airbrush sometime in the future to give a nice glow effect to match the boards that came with the core set.