Ghost Samurai and Honeypots - Unboxing

Malifaux – Recently I picked up some new Ten Thunders models to expand my existing Resuresctionist force as well as the small Neverborn force I've been working on. These are part of Wyrd's new plastic line and the quality continues to impress me. 

Initially I thought the plastics lacked the character and humor that the original models in the line had, however as I pick up more of them the quality and proportions are growing on me. Combine that with the ease of gluing plastic models and the end result is pretty great. 

I still feel like it would be beneficial to have more options on the sprues. As they are now you really only get the same static pose as you would with a metal model. Granted the poses are pretty great and dynamic, it would still be nice to have some head or arm options to be able to customize the models so yours look different than others on the table. 

I'll post up more pictures after I get these assembled. I just wanted to get some shots of the actual sprues posted as you don't really see much on the box art and for some reason Wyrd isn't showing painted models in their online store like they used to.

You Owe Me ... Dark Debts

Malifaux – After reading the Ten Thunders book for Malifaux, Jacob Lynch's crew was the one that stood out to my as very unique and fun to play. Yes I know they're technically Neverborn and i should just stick win Shang Tsung, sorry Yan Lo, but something about this crew has me hooked. 

Jacob Lynch essentially runs an Opium Den, however in Malifaux it's not opium, the drug of choice is called Brilliance and it eats away at the users soul leaving them as a mutated shell. Pretty cool huh? In game the model has a bunch of cool abilities that tie his mechanics and story together really well. As I've come to expect from any model in Malifaux, just by reading their card and the names of their abilities you get a sense of exactly what their story is.

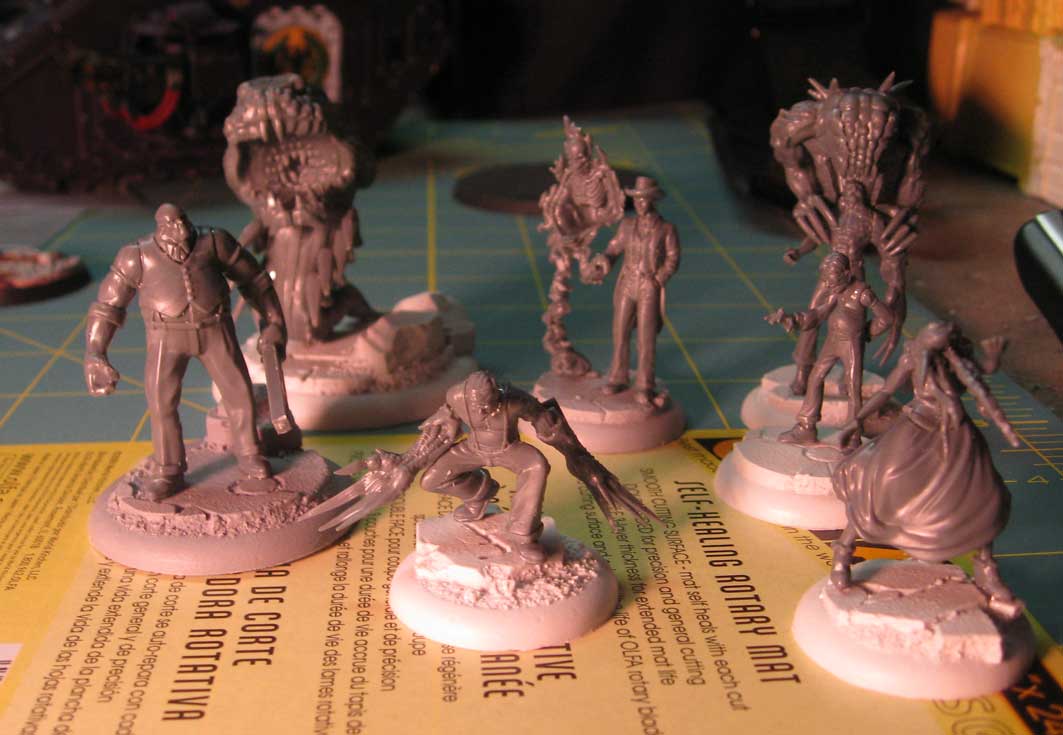
In addition to the Dark Debts box, I had Mr. Tannen, Mr. Graves and Santanna to assemble. I still can't get over how huge the boxes are for the new plastics, it seems to be such a waste of space. Looking at the size of the sprues there's not really anything that can be done unless the sprues are cut down to fit into something smaller, but at that point you're adding more potential headaches that should be avoided.

The models themselves are really sharp (both looking and literally, the clawed hand drew blood). Just like the other Wyrd plastics these are very thin and proportional looking. A word of caution, only remove a part from the sprue when you're ready to glue it in place. These parts are so tiny and small that it's easy to lose them or mistake them as flash. (Mr. Tannen has a coin in his fingers) On the sprue each model has a designation as A, B etc. all the parts associated with that model are number A-1, A-2 etc. There aren't any paper instructions so good luck figuring out how those tentacles go together. Minor gripe really but given the number of GW kits I recently assembled there's something to be said for printed instructions.

Nice thing about these is the mold lines are very slight, which means very little scraping at tiny parts. After a bit of cursing and searching on the floor for parts that escaped the confines of my tray; I was able to get all five boxes assembled. Jacob's crew looks really cool and I can't wait to pick up some Beckoners as I think they're essential to his crew functioning and are gorgeous models that I must own.

Santana is a cool model. It was pretty hard work earning her and I like the idea of a Henchman exclusive model. But of course they models was also offered as an incentive for the RPG which takes away some of the exclusivity. Of course it wouldn't make sense to tool a plastic die for a one run miniature so I would guess well see several ways to get these in the future. And since I really like the model I don't have an issue with the secondary value dropping because of increased supply. Had I worked so hard to get this as an investment I might be a little peeved about the so called "limited" nature of the sculpt.

Putting Plastic Together ... fumless fallacy

Over the weekend I sat down and put together the blevy of plastic kits I've had sitting around waiting to put them together. While it's probably counterproductive to put together more stuff to paint before I finish my existing project load I needed to take a break from painting for a little while.

When assembling plastics it's important to use the correct glue. For most model kits the correct glue is plastic cement. (Super Dungeon Explore is an exception to this) Plastic cement causes a chemical reaction which softens the plastic and welds the two parts together into a solid join. This is more durable than a standard glue join and the models are unlikely to come back apart without serious repercussions. (notably truly broken pieces).

It's been some time since I had an assembly line going to put together a bunch of kits at one time and I forgot how messy plastics can be. Shaving the mold lines and sprue nubs left my workspace covered in plastic shavings. It's a good thing I set up in the basement where it's easy enough to sweep up the mess. The lesson to be learned here is to put a drop cloth down when doing mass assembly. It's also helpful to keep the shop-vac handily.

When choosing a plastic cement there are a ton of choices available. I prefer to stick with the "non-toxic" blue testors brand in the metal tube. It's cheap and easy to get and does a great job. The only problem is the tip is far from accurate and to much pressure on the tube means glue everywhere. I've heard there are better glues that only require a single drop with a pin to hold the plastics together. I have to assume they are also fairly smelly and toxic like the red tubes of testors. 

Not feeling adventurous I stuck with the stand by blue tubes. Just because it's labeled "non-toxic" does not mean it doesn't smell. In fact the glue I was using had a very strong citrus odor that lingered well beyond the time it took for the glue to dry.

The next important tool to have on hand are a pair of side snips or sprue snips. These allow you to easily remove the pieces from the sprue. Don't twist the pieces off or try and carve them off with an exacto blade, you'll wind up damaging the part and probably gouging yourself with the blade. A good pair of hobby snips will cost you less that $15 and will save you much more than that cost in potentially damaged models. You'll also want to have some fresh exacto blades around to scrape off the mold lines.

With the proper tools in hand I went to work. Over the course of a few hours each night I was able to assemble Skullvane Manse, an Imperial Stongpoint, Dark Debts, Mr. Tanner, Mr. Graves and Santana Ortega. Next up I'll review these kits individually.