Smells like ... Vinegar (Decal Tips)

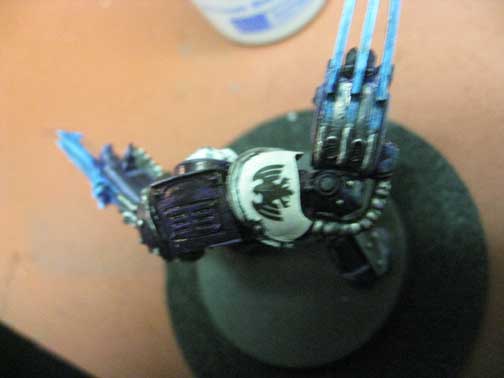
Warhammer 40,000 – As promised the next step is actually applying the decals. One of the tricks I've learned over the years is to use Micro Set and Micro Sol. This nifty products help to melt the decals into the model so you don't get that weird halo line that needs to be painted over.

Step One: Paint the area you plan on applying the decal to with a gloss varnish. This serves two purposes, first it gives you a pretty smooth surface to apply the decal to. Second something about the Micro products reacts with the varnish to help the decals melt in. This might be completely a rationalization on my part as I'm no scientist but it's the way I do it and it seems to work great.

Step Two: Put down the Micro set on the area you want to place the decal. Paint it on with a soft brush. 

Step Three: Slide the decal in place. At this point I gently dap with a paper towel to remove excess liquid.

Step Four: Gently apply Micro Sol over top over the decal and leave it alone. The Micro Sol will soften the decal and cause it to "melt" into the paint.

Step Five: Once it's dry apply a second coat of gloss varnish. This will protect the decal from damage. If you desire a matte finish apply that after the gloss has dried.

Pretty simple really. A small bottle of either product will last you forever, I picked mine up years ago and still have an almost full bottle of each.

So how did the laser decal paper hold up? The answer is pretty good. I only had minor problems with the toner coming off and was simple enough to paint over the decal with some thinned down paint. I highly recommend this style decal paper over the more readily available inkjet papers.

The devil's in the decals ...

Warhammer 40,000 – Continuing my quest to complete this company of marines prior to my various Kickstarters arriving (Relic Knights, Kingdom Death, Chibi Minis to customize Super Dungeon), I've realized that I misplaced my decal sheet. Way back when I ordered some Iron Raven sheets from Griffon Games, at some point the ever benevolent GW sent them a cease and desist letter forcing them to remove the decals from their store. The bummer about this was I needed another sheet to finish my project. I never found a great solution since the army got put on the back burner. 

Fast forward to the second time I tried to finish this army and I began looking into inkjet decals. These worked ok for the marine names on my bases but if you look close you can see a faint red halo around the decal. Even though they were sealed per the manufacturer's specs the ink bleed a little. Something about black inkjet ink having red in it that separates when exposed to water. This just wouldn't do for bright white shoulder pads.

Forge World eventually released a Raven Guard Transfer sheet however for the the cost I'd only get a handful of black ravens. At about $20 a pop this just won't work.

After doing more research it seems that my best option (aside from buying an ALPS printer) is to use Laser Transfer paper. Since this is toner based I shouldn't get the same bleed-through issue and as a bonus I shouldn't have to seal the decal prior to using it which should help the decals to adhere to the curved shoulder pads better.

Next I had to create the art. After a few attempts I created a logo that was close enough to the original decals I used. While I was at it I also drew the tactical and devastator symbols so I have enough of them to complete my company. 

Next up, applying decals.