Downtown Malifaux - Stage One

Malifaux – After this year's family vacation I have a boatload of inspiration images for the next big project I'm going to do. My goal is to build a super detailed fixed board based on the town of Eureaka Springs, AK. During my visit to the town I was really impressed with the cramped vertical feel of the town. I think it will make for an interesting game board. I've been leery of doing a fixed terrain board since the tend to get boring after a while. However I think I'll only bring this one out for special events or con demos. 

This time around I'm going to plan ahead and build all the individual components before I begin.  I want the cobblestone to match the bases I've used for my Ressurectionist forces, so first things first I need a way to create lots of cobblestones that can be used for the street. Having learned my lesson with the sewer board, I ruled out cutting individual stones. The process was far to time consuming and won't give me exactly the look I want.

So off to the craft store. After looking around at various options that might work I settled on some brass tubing. The tube is of course a tube, so I had to carefully bend it into a rectangular shape. I did this with two different size tubes so I could create some variety in the pattern. 

I then mixed up some miliput (apoxy sculpt might be a better choice but this was 40% off) and roll it out into a large smooth flat area. Once that's done it's a simple matter of taking the tube and pressing the pattern. Repeat until the area is covered.

This didn't work out as well as I had hoped so before I move on I need to research a better way to flatten the putty. I think a clay roller might work ... unless we have a pasta maker lying around.

Once I solve the flatness issue, the next step will be to cut this into squares (or a large section) and make a mold. This will allow me to quickly duplicate the process to cover the streets. I'll also create some optional pieces to create more interest like man-hole covers and grates. 

Undead Horses, couldn't drag me away

Malifaux – A while back I picked up some undead horse from Reaper. I intend to use them for a special "Doner Party" Scenario. They also look pretty cool pulling the supply wagon, so I think I'll get some use out of the models. I based them the same as the rest of my Ressurectionist models with a Victorian-style cobblestone base. I'd probably be better off putting them on a wasteland or ice base for the scenario, but I'm all about getting multiple uses out of a model.

To paint the horses I started with a base of Deneb Stone, from the foundation line. I then did a wash of Ogryn Flesh followed buy a wash of Leviathan Purple. This created the bruised flesh color I wanted. I then mixed up a light beige highlight color and applied that to the model. And followed that with a light Sepia wash. After some minor highlights the skin is complete. 

I painted the muscles and exposed guts with a deep crimson and followed that up with the same washes as above. I'll go back in a add some of my "any color red" highlight and a touch of gloss varnish to finish up.

The hair was painted with a dark gray followed by a black wash. (easiest way to paint black IMHO).

Wyrd Gencon Order Arrived - First Impressions

Malifaux – This year I kept my Gencon order pretty light. I picked up the new book (love seeing my name in print) and the Nightmare Hanging Tree which netted me Miss Terious the special edition Death Marshall. Wyrd must have had a massive amount of orders again this year as it took much longer than normal to get this in hand. No worries as the models aren't out for general release for a month or more I wasn't in a rush.

Quickly flipping through the book I noticed it's a little smaller than the previous books. This makes sense as there's not a huge add-on to the rules. Essential Storm of Shadows is a faction book for the Ten Thunders. The catch is all the Ten Thunders models in this book are dual faction, meaning they can be used either as Ten Thunders or within their native faction. The idea behind this is the gangs from the Three Kingdoms are infiltrating the existing factions. A nice bit or rules reflecting fluff. 

The art and design of the book is very much the same as the last two books, so fans of that style won't be disappointed. They've also kept with the story, rules story format so you can sit down and read the book cover to cover.

I haven't sat down to read through the book yet, but will post a full review after I've had some time to thoroughly read it.

The next items that I pulled from my big box are the new plastic models. The Hanging Tree and Miss Terious, both are special edition models which in itself is impressive to do a small run of detailed plastics. The boxes these models come in are huge, I can see this being a problem for stores with limited shelf space as the Miss Terious box is almost as big as a crew box by herself. It seems like they could have better designed the boxes to take up less space and use less packing material, but it's a minor thing I imagine retailers will voice their concern as more of the line comes out in plastic and the number of skus overwhelms the existing shelf space.

Taking the model out of the box the plastic appears to be a solid grey similar to the GW plastic but not quite as brittle. Miss Terious in in a bunch of small pieces and the detail is pretty good. She does look very different then the metal minis in the line, I don't think that's a bad thing and I won't be able to finalize my opinion until she's painted as next to the other Guild models I own.

The Hanging Tree came in an even bigger box, however this one has foam pads to keep the sprues from banging together. A nice thing considering the limited nature of the product however not really necessary as the plastic seems to be very durable. I'm not overly impressed with this model. It's clean and pretty sharp but compared to the Nightmare models of previous years this one falls kind of flat. Again first impressions only my opinion will probably change once I get it put together and painted. 

My plan is to pick up a Garden of Moor cemetery set and have a themed terrain set using the Hanging Trees. Of course given the amount of projects on my plate that isn't going to happen until later this year. In the meantime I should be able to incorporate them as terrain pieces on my other boards. I don't really see using them as Hanged models given the dramatic increase in base size.

Labor Day Special

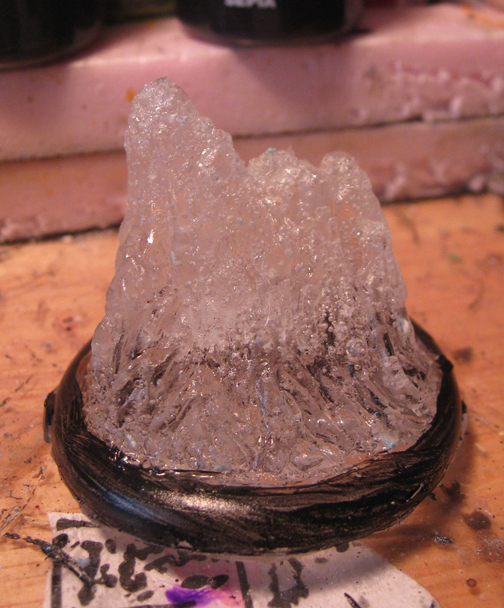
I just added the new Clear Resin 50mm Ice Pillars and 50mm LED Flickering Flame markers to the online store. They're on sale right now for just $10. After the sale I'll have to increase the price to account for materials costs but in celebration of the Labor Day Holiday you can get your now for a special price.

Due to expected demand please allow up to 2-3 weeks for delivery.

Army of Darkness

Malifaux – A friend of mine was kind enough to pick up the Alternate Seamus sculpt for me when he was down at GenCon 2011. I really like the sculpt just because it's so silly, the homage to Evil Dead seems to be over some peoples heads but fans can see it right away.

I've gotten my base coat and initial wash done and so far I'm really digging the model. My only complaint is the flintlock looks significantly smaller on this model. The base coat is all GW foundation paint thinned down so it's not so thick. I've also started the road to detailing with some GW washes.

I think I'm probably going to give him red hair this time around. That way I have a young and old version of the Mad Hatter.

Malifaux – Recently I began building tokens and markers for all the special events and encounter scenarios for Malifaux.  The easiest to produce are dynamite counters and treasure counters. These were easy enough to build using the Hirst Arts molds I had on-hand. In the same mold is also a sack that looks close enough to be a Bag of Soulstones. These can double as evidence counters.. 

The other big token I needed to create was a Supply Wagon. Most every model I found was to large to fit on a 50mm base. So I molded my own parts to create a wagon. I think they turned out pretty good, and I made several versions. It's good to have more than one for special scenarios as well as having multiples of all the tokens for events I run. Players tend to appreciate nice table and tokens, instead of generic terrain with pennies or blank bases.

I also built some 50mm column/well tokens. These fit two special scenarios that will be featured in the mini-league I'm running. These are fairly simple carved foam pillars with some green stuff detailing to bring it all together. I like these as they also can fit multiple markers needed for the game.


Mini Malifaux League - Week 1

Malifaux – Week one went off without a hitch. We had 13 players signs up for the three week league with every faction represented. Everyone showed up on time and game wrapped up by 10 pm (most before that). I was happy to see some new faces participating in the event as well as the regular crowd.

Week One used the "Break the Seals" scenario that was featured during the GenCon 2011 event. A fun scenario that involves three columns in the center of the table. On player has to defend the columns the other has to destroy them. The scenario was quite fun, although I did have one player voice his concern that the defender has an advantage. Based on the results I would have to say it is a minor advantage if anything. 

We did have several tables of TerraClips set up and players seemed to enjoy them. I still prefer more three dimensional terrain, but for what they are and the easy of storage TerraClips is a great product. I will say you need to either add additional elements to the board or give height to some of the printed elements to get the right amount of terrain on the board.

Song of Fire and Ice

Malifaux – My experiments with clear resin have finally come to fruition. I finished up my Snowstorm and have made enough Ice Pillars to get through a game with him. 

I've also gotten a technique for doing clear flame wall/growing fire tokens. Painting them with ink mixed with clear varnish makes a realistic looking flame. By adding a LED light to the token it glows and looks pretty good. The lights I've been playing around with were ok but I found some flickering tea lights that create the perfect glow for flame effects.

Of course the mechanism with the switch was far to large for my existing flame markers so I sculpted a new taller version that actually looks more like a raging fire than the previous version.

After casting the clear flame with a urethane resin I dremmeled out the bottom of the base to insert the dissected LED tealight. With that super-glued in place I began painted the flame with the ink mixture detailed above. Once that's done it's just a matter of sealing them again to tone down the gloss. I'll probably offer these up in my online store once I have a quantity built up, but the time a materials to create these is significantly more than the simple plaster versions so the price will be a bit higher.

Mini Malifaux League

Malifaux – RIW Hobbies will be hosting a Mini Malifaux League beginning August 16, 2011. The league will be basically a three week "tournament" in which players will play one 40 Soulstone Encounter each week. This is the prefect opportunity for players to test their new toys presented in Malifaux Book 3 - Twisted Fates, proxies for unreleased models are allowed as long as they are a close approximation of the model they represent.

I've posted the scenarios up on the Paperbag Warriors page. Buy in is $5 and prizes brought back from GenCon will be awarded based on attendance. 

Format is:

• Single Faction

• Domination Format (per Gaining Ground)

• Story-based encounters 

• Painting is encouraged but not required

• Games begin at 7:00pm sharp 


Malifaux – Forging along with my experiments in clear resin I've begun to attempt to cast my flame wall markers in clear resin. My goal is to eventually have these light up. The initial casts were slightly flawed due to the ridiculous humidity. However I think they will work fine for the experiment. 

I'm going to mix ink with a clear varnish to paint the flames. I think that will not only give me more control over where the color goes but also be a bit more durable. After painting is completed I'm going to drill out a space to insert a LED bulb.

Spirited Away

Malifaux – Earlier this month I participated in a Malifaux Tournament and won "Best Sportmanship" which was pretty cool as I don't often get to participate as I'm usually running the events locally. I think I came in around 4th overall and had a blast. The prize was my choice of any of the small boxes, so I chose Snow Storm.

I really like the look of the model and I think it could potentially add quite a bit to my Kirai crew. Creating Ice Pillars, pushing models and providing a much needed tank are just a few of the options I see using the model. Eventually I might break down I pick up a 'tina crew of my own but right now I'm happy to add the Graverobbing (really why not a single ability deals with corpses?) Spirit of Chill to my Three Kingdoms Spirits.

Opening up the kit the first thing I noticed is it is a hybrid kit consisting of the large model in resin and the antlers and child as metal parts. Looking at the resin I'm starting to think the material is prone to issues (excessive flash, nasty mold lines etc) and it might just be an industry wide issue. Some of the mold lines on the legs are really deep, almost like the mold wasn't aligned properly and the fur along the arms and head has some weird flash that requires a bit of patience to remove.

After cleaning up the kit I pinned everything in place. I stuck both models on a temporary base to paint them. At the same time I cast up a clear base to mount them to. [TIP: Urethane Resin hates humidity, if you're having issues with excessive bubbling buy a dehumidifier.] 

I really don't like the two-tone studio paint job so I decided to stick with a monochromatic scheme for my Snowstorm. Luckily I had quite a bit of the custom colors I mixed for my Legion of Everblight models left over. I started with a baby blue base, followed by a blue wash. Next step was to lighten the flesh until I got the cold ghostly feel I was looking for. The child was painted similarly to the way I painted Rasputina a few posts back.

Overall I'm happy with my progress so far and will add some snow to the base to tie it all together.


The Dead Shall Rise

Malifaux – Wyrd just Tweeted some new pictures of the some of the Res. Avatars. Kirai looks pretty amazing.

Love the Nicodem concept it looks really fun. 

I've been following this thread on the Wyrd Forums. Just utterly amazing.

It's getting cold in here.

Malifaux – Over the weekend I received another commission for a Rasputina crew (Oddly enough this is the first 'tina set I've painted). My client had no preference on the color scheme so I decided to go the traditional white and blue route. 

With the painted Ice Pillars I make, I've perfected my preferred method of painting ice. I use a bright baby blue as a base and shade it with a dark blue wash. From there I drybrush the baby blue, followed by a dove gray and finally white. The same method works well on the Ice Golem and Gamin, however it does require going in and painting highlights and smoothing out the shading. I used a similar method to basecoat Rasputina, and them worked out the details to bring her up to the appropriate painting standard.

I decided to used the Clear Ice Bases to base the crew. Rather than attaching the models prior to painting I prepared them on a separate base and attached them after they were finished. Clear resin can be tricky as tiny imperfections in the mold give it a slightly cloudy appearance. I've found coating the base with a gloss varnish clears up the cloudiness and gives it a wet look the feels like ice. After that's done I paint the edge of the base with a gloss black which seems to adhere better to the clear resin than a flat finish. 

After pinning and glueing the models into place, it's time to add the snow effect. I mix one part snow flock, one part tacky glue and one part white paint to create a paste. Carefully apply it to the base where you want snow. I then bury the whole base in snow flock and let it dry over night. Once it's dry I gently brush off the snow flock and seal the model with a matte sealant. If the ice loses it's sheen simply reapply the gloss varnish where needed.

Jersey Sure

Malifaux – So I finally finished up the Neverborn Hockey Jersey I was working on. Figuring out the front logo was a bit more difficult than I anticipated as just embroidering it to the front of the jersey wouldn't give the look I wanted. The jersey looks really great and I'm pretty happy with the results.

As a follow up to this I just wanted to direct people to another post which detailed the process of making the jeresey. This was a custom job and I have no intention of mass producing these, however I'm always on the look out for new and interesting projects so if you're looking for something special please just use the email me link to contact me directly to discuss the project. 

Some of the other projects I've done are motorcycle style patches for a gaming club, custom dice bags, award patches, jerseys and other random things.

Victorian City continues .... Part 2

I've finished commissioned board I've been working on.

The final three buildings have a gritty old town feel to them. This was and interesting project to work on because my client had a very specific budget and a need for general purpose terrain that would fit all the encounter locations. So I needed to find a way to make nice looking terrain with the time and materials I could allot to the project.

Overall I think they turned out well, using a template helped to save time as did the lack of doors and window frames. The client has been really happy with the building he's received so far and I think these will receive the same response.

In other news, I bought some "Brown Plastic Furniture" from thequatersource.com. My first impression of the kits was that they are really tiny looking. However, after placing them on a "normal" size base it becomes obvious that these are pretty close to the correct scale. I purchased the bedroom, bathroom, den and kitchen sets. On the site these are the cheapest things they sell. The quality is what you would expect from cheap chinese plastic. It's a hard plastic rather than the flexible rubber type so repainting them shouldn't be an issue. I'll probably use these in my western style buildings, since the scale is pretty close. 

For "overscale" buildings I think I'll need to stick with scratch-building my own stuff. Look for articles on building beds and tables in the future.

In the 1800's products like windows and furniture was made to a smaller scale than what we have today. I'm hoping to take my daughter to Greenfield Village this weekend, and get some inspiration for some new projects. In particular the working of the machine shops should give me some ideas for some Union buildings.

..............................................................................................................................................................

In non-miniature news, BP may have started a chain of events that will bring about the end times if you believe this report. I don't know how much credit I give a site advertising "cheap" ipads. Regardless the whole thing is a terrible mess. Benzene is not to be messed with, as a designer I know many guys who've developed prostate cancer because of the widespread use of acetone and benzene as cleaners and adhesive removers.

And then there's this.


Hell Yeah!

Helldorado – The english rulebook is finally available for pre-order. Looking forward to picking this up as the quick start rules seem geared more towards someone who has played the game before. I really like the setting and the models and can't wait to see what the full ruleset is like.

I've made a bit of progress with my skull piles and bone walls. Simply priming them brown and a quick two color drybrush got them to an acceptable level. I think I need to wash them and paint some highlights on to bring it up to a standard to match the rest of the board however.

What is this?

Malifaux – Looks like Wyrd has started releasing wallpapers of some different versions of the Masters. I'm really a fan of the two versions of Seamus. The "hulked" out version reminds me of Hyde from the The League of Extraordinary Gentlemen. Wonder what's up with the headless Justice ... could she really be dead? And is it just me or does that Belle in the background look vaguely like Pandora or Perdita?

Off the painting table ....

Malifaux – Just finished up another Sonnia Crew. This one had an interesting red and purple color scheme which is a bit different than what I typically get requests for. I think they turned out pretty cool. The flame was interesting to paint as my client hates yellow so I had to vary my typical flame technique to skew more to an orange shade.


Magnets ... how the f@!# do they work?

Malifaux – Recently I began work on a new commission. The customer wanted modular magnetic bases, that could swap models from 40mm bases to 50mm and a set to swap 30mm models to 40mm. The idea being only having to assemble and paint one set of coryphee and two sets of spiders. The desire is for an industrial feel appropriate for the setting.

To begin I sorted through some potential components that would serve the purpose. I settled on industrial grating with field stone. The general feel is similar to some other sets of gothic/technology bases I've seen. After measuring and being sure the models could attach to a removable element of the base, I began construction. 

For the Coryphee I created a platform for the crouching one to stand on and a half globe for the pirouetting one to attache to. The half globe fits into a vent fan nicely. One of my goals for this project was to create bases that could be fully painted without the elements attached and still look good. 

The spiders were going to be an issue. I had to find and element that was sturdy enough to mount them to without them ripping off the base. After looking through my bits I remembered the Hirst Arts pipes. These are chunky enough to fit a magnet and sturdy enough to give plenty of mounting points. 

After completing the base work I began experimenting with magnets. I didn't want to just sink the magnets into the bases, as from past experience they do come lose over time. So I made a quick mold of the base and half filled it with resin. Than I put the magnet in and filled the mold. After a few tries I found the correct depth needed for the magnet to maintain attraction. Next I made a quick mold of the elements and repeated the process. TIP: Mark your magnets with a north and south side before you begin. I didn't do this with my first test and the pieces repelled instead of attracting. While my wife found this hilarious, it's a pain to try and figure out after the fact.


World Steam Expo

Memorial Day weekend I had the pleasure of running Malifaux demos both Saturday and Sunday. The event was lots of fun with plenty to see and do. There were several bands that I wasn't familiar with prior to the con, but they seemed pretty good for niche steampunk themed music. The costumes were pretty amazing and I'm sorry to say I forgot my camera when I was walking around the con so I don't have more pictures to share of the rest of the areas.

The vendor room was packed with interesting things. Lots of costumes and accessories, (gears, goggles, fancy hats and what not) I broke down and bought a top hat. However I refuse to pay for "welder's goggles" that have been modified. I'm going to make a pair of my own since the materials are incredibly cheap and I want mine to be Malifaux-themed.

Demos went amazingly well, I started 2 hours early on Saturday because the table was ready. As soon as I set up my demo tables and other gear, numerous people flocked to the tables to ask questions and learn more. Around 5 when the demos were scheduled to start we had a sudden influx of people, with numerous quick demos of the mechanics and an explanation of the game. Well over half of the people that received the "quick demo" came back later to either participate or watch a full game.

Sunday we went none stop from the time the room opened until it closed at 11:00pm. Luckily I had two guys there to help out. Both Trevor and Alan were super energetic and played tons of full demo games. Boiling the game down to a simple game of war with a twist was the easiest way I found to explain the mechanics to non-gamers (which we a had a ton of). It's an easy sell for people who have played Warhammer, Warmachine or another miniatures game in the past. Most of them loved the easy buy-in for a skirmish style game and thought the rules were a breath of fresh air.

Special thanks is in order for both RIW and Pandemonium (game stores in the area). Both stores provided coupons and information for their upcoming leagues. I'm hoping to see lots of new faces at both locations.

In other news, Pandemonium is starting their "Faction Wars" league Monday June 14th. Check the Wyrd forums for more info. And RIW has their Tuesday Tussels every Tuesday night (Malifaux has significantly out numbered the Warmachine players every week...No hate though). If you live in the Metro Detroit Area you should definately try to make it out to either location.