Decoding the Cypher – Dark Angels Successor Chapter (sorta)

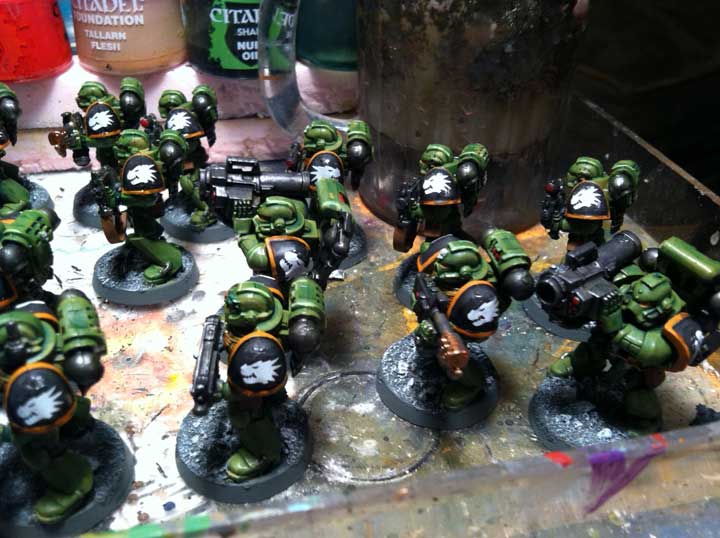
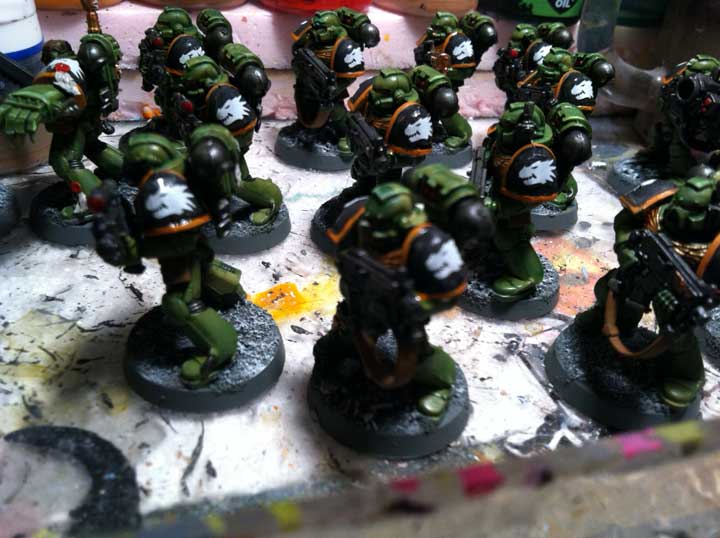
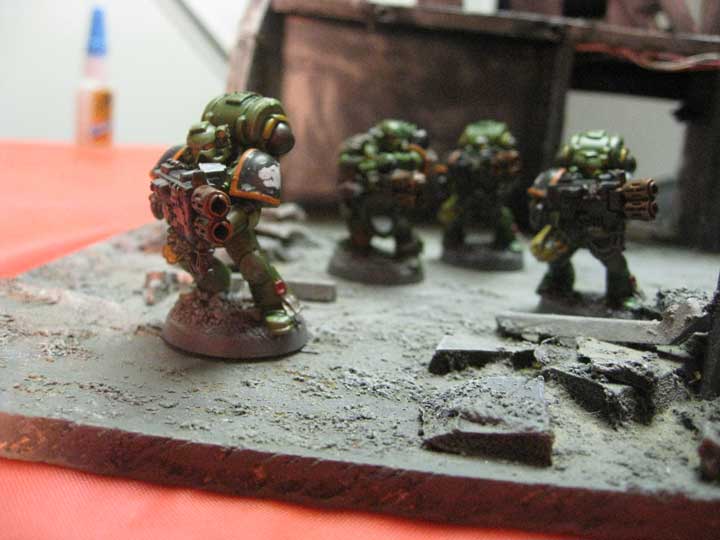
Warhammer 40k – The commissions just keep rolling in. This time around my client picked up several of the Dark Vengeance boxes to build a marine army. He started out playing Tau and Tyranids however given that most of our group plays some variety of marines he decided that it would be good to have a small marine force to keep on even ground.

Couple that with the really cool fluff about Cypher that rumours say might be rearing his head again and you have motivation to put together a secret fallen themed marine list. Come January I'm guessing he's going to have a bunch more dudes to add when the Dark Angels Codex releases. (mmmm plasma goodness and tons of terminators).

He used the marine painter on Bolter and Chainsword to come up with a pretty cool two color scheme. The top half is black and the bottom is green. I really like when I client provides me good reference material for a job. It keeps us on the same page and means less back and forth regarding basic color choice. (of course I also love when I client says do what you want and loves whatever I come up with). However after some hemming and hawing he decided to stick with the traditional Dark Angels color scheme. 

One of the things he mentioned before turning the models over to me is that he planned on using them as Dark Angels and as whatever marine codex he felt like playing at the time. To accomplish that he did some nifty conversions including building his own "Cypher" model which has enough bitz and do-dads to count as whatever piece of wargear he might want to equip in any game. I personally find this to be a better way of building a multipurpose model. I know some guys love their magnets, but for me they seem to be more trouble than they're worth.

Painting is pretty straightforward. I started with an Orchide base coat and did a Biel-tan green wash. This gave me the basic shading I was looking for on these models. From there I went in and painted the cloaks Denab Stone. The plasma coils and power weapons with Mordheim Blue and then a gun metal and brass color for the metallic parts. I quick wash of Nuln Oil shaded the metallic bits and a sepia wash gave me the shading for the cloaks.

Next step is to pick out the details and edge highlight the models. The client requested tabletop quality so I'm not going to go overboard with the highlighting. The first batch he provided included a tactical squad, librarian, chaplain and two commanders.

The Back Forty K (ok that's not as clever as I thought)

Warhammer 40,000 – It's weird how cylical my gaming group is. We can go weeks without getting together and then jump right back into a weekly routine. I really prefer having a standing night during the week to play as it's less likely to get interrupted by other obligations then events on the weekends.

Anyway we're back into playing 40K and I'm really liking that sixth edition seems to play faster than the previous editions. The allies rules work well for team games especially when they're all imperial armies. Yes I know it's a bit weird to have all imperials fighting each other. 

Last night we played a 3,000 point game with five guys. I paired my 1,500 points  of my Twilight Ravens (Space Sharks this game) with 1,500 points of Drew's Salamanders and we took on 1,000 points each of Dark Angels, Codex Marines and Imperial Guard. For the game we just chose to do three objectives worth 3 points a piece with annihilation being a secondary objective.

Turn one saw two Salamanders dreads and a Twilight Raven dread arriving via droppod. Their goal was to take out the Leman Russ loaded out with Plasma Weapons. Unfortunately they only caused it to loose a few hull points. The guard were able to get a lucky shot and destroy the TR Dread. However the Droppod delivered the locator beacon to a sweet spot for the rest of the pods that would be arriving later.

Tybereous is so cool he and his Red Breathren carved up two squads of Dark Angels, Dark Angels Company Master, an Attack Bike and a Platoon of Guard. I really like using the Carcadons master as a supplement to my shooty force. 

We were able to get in 4 solid turns before reaching our designated end time and essentially all the Dark Angels and Guard were wiped out with a few of the codex marines hiding out in the ruins. I claimed two of the objectives and Drew picked up the other one. 

The game was a ton of fun and moved quicker then I expected, this includes a bunch of looking in the book to reference special rules and look up how things work in this edition. Nice enough there wasn't a single rules argument which either says my group has matured or GW has written a relatively solid rule book.

Leaping Lizards - More Salamanders

Warhammer 40K – Moving forward with a full head of steam sixth edition has several of my painting clients really excited. In particular my friend Drew is loving his Salamanders force. However he has come to the realization that 50%-75% of the games you play in sixth edition 40K are going to be objective based and he needs more troops. (While I pointed out that is some of those fast attach units are scoring he doesn't think they fit with his army theme).

To increase his options he picked up two more squads from Black Reach and asked me to add a power fist and storm bolter to the squad to fill in where he might have points to spend. He didn't want me to spend a ton of time on the conversion so I kept it simple and clipped off the point arm on the sergant and replaced it with a power fist. the other sergant had his hand clipped and rotated so he could hold the storm bolter "nonghettostyle." with plastic models simple swaps like this are easy so loing as you use plastic glue. using the glue to melt the plastic fills in weird joins and creates an incrediblly strong bond.

Painting followed the same scheme as the rest of the army, gretchin green base, green wash etc.

Oretegas finished

Quick update the Ortega crew and associated mercenaries are done. Trying something new and posting from my phone. Bit of a pain to type.

My client loved them and is looking at adding more models to his collection. I'm guessing there will be serveral Guild crews on my painting table in the near future.

On the painting table ... You want salsa with that?

Malifaux – I just started yet another Ortega crew for a commission. It's really not surprising as Perdita is one of the most forgiving masters out there for new players. Pretty much point and shoot, literally.

It turns out Tuesday nights, as my FLGS suggested, is probably the worst night for the players in the area that are interested in the game. So I'm trying to work out a better day that isn't so busy that we can't get any tables. I ran a demo for this client and his friend on Sunday which seems like it might be a good day for the player base (not so much for me ... but we'll see). 

Both players were very excited about the game and had a ton of questions on thing they might want to add and the strengths and weaknesses of the various factions. I think I might need to do another series detailing my thoughts on each faction as quite a bit has changed since the last time I did a faction breakdown.

After consulting with the client he wants a darker version of the crew. He really liked the scheme on my demo Lady Justice crew so I'm modifying it slightly to work with the family. He wanted Perdita in all black leather which is going to be a bit of a challenge to make the model not look flat in an essentially two color scheme but I think the grey with wash technique I've been using for black fabric will work to bring out the detail.

This time around I pinned Nino's coat to the protrusion on the base I mounted him to. I think this is going to increase his durability significantly. Most Guild players I've met have had to do multiple fixes to the leg of the model as the attachment point is very thin and prone to breakage when there is stress put on the model.

After seeing the WIP shots of this crew my client asked that I add in a Convict Gunslinger and Hans. One thing your can't fail with is more firepower. I'm looking forward to painting Hans as he hasn't come across my painting table as often as the Gunslingers have.

Black Friday Deals - Don't forget the little guys

While I'm sure most of you have already done your shopping by the time this posts. I wanted to remind you that Saturday is Small Business Saturday and is a great time to get out an support your local hobby store. Take some time to make a wish list with your store owner and direct your friends and family to that shop when looking for gift ideas for you. If your store owner doesn't do a wish list suggest it as a means to drive sales for his store.

Meanwhile I've put some hard to find items up in my ebay store front that would make a great gift. Check back often as I'm still in the process of cleaning out my game room of pieces I bought because of an unnatural obsession to "catch em all." And while they don't necessarily fit my playstyle or tastes anymore they are great finds and many of the items are out of print and hard to find.

On the painting table ... 3+ Goodness

Warhammer 40K – So I'm getting back into the swing of painting my company of Space Marines. The last time I got the bug I was able to assemble and entire companies worth of marines as well as numerous optional attachments. However when it came time to paint them up I got three colors of base coat on them and lost interest (seeing a trend here?) After playing a few games of sixth I pulled out my marines to see where I stand on getting them completed.

So far I have fully painted, based, sealed and felted:

HQ

Chaplain on Bike

Kasaro Khan on Bike (doubles as Bike Squad Sergent and Librarian on Bike)

Close enough to done to count

Shrike

Pedro Cantor 

Troops

Tactical Squad 7 - 10 marines with Missle Launcher and Flamer 

Tactical Squad 3 - 10 marines with Missle Launcher and Flamer  

Fast

Assault Squad Sword - 10 marines with 3 plasma pistols 

Assault Squad Arrow - 10 marines with 2 plasma pistols and thunder hammer

Bike Squad - 3 Marines with Attack Bike  

Elite

5 Terminators

Sternguard Veteran - 10 man squad 

Heavy

Dreadnaught with all weapon options 

So as you can see from this list I have 2 devastator squads, 4 tactical squads and the associated transports to finish up before the company is done. Just a wee bit of work.

Like many marine players I know, I keep a composition book full of lists that I can build from my collection at various point levels. Currently I really like to build 750 lists as this allows me to mix and match to suit my mood at 1500 points or to easily have my half of a list ready for a team game. Rather than set a year end goal I'm never going to make I decided instead to try and finish up my current favorite units that seem to make it into every list.

Land Raider Achilles – This ridiculously expensive piece of machinery is by far my favorite variant. Having multimeltas and a mobile thunderfire cannon is to cool to not use. Add in the special rules that make is almost invulnerable and you have a force to be reckoned with. Since picking up the Badab War books this is my second favorite model to put on the table (yes Tyberos with his lightning claw chainfists is the first).

This vehicle is my first priority to finish up. I really just need to do the purple highlights and the other detail work before I can apply the transfers and seal this bad boy up.

Next up on my list is my Master of the Forge on a bike with a conversion beamer. Again a mobile gun platform is to cool to not use. I love the conversion I did to build this model and really need to finish up the paint job. Mostly this is just some highlights and detail work. Should be easy enough to wrap up before the end of the year. I also need to paint up his base, I'm using the wasteland bases from Dragon Forge with a scroll added to the front front each models name. the large attack bike base is just right to fit my quad driving techmarine.

Finally I need to finish up my Thunderfire cannon and 2 razorback/rhinos for my troops. Once these few units are done I will have a solid force completely painted that I can run sixth edition games with. Hopefully I don't lose interest again before and I'll have these done before seventh edition.


Review - CMON: Super Dungeon Explore Battlefoam Bag

Super Dungeon Explore – So since I'm pretty into this game it bummed me out to open my box and find that Starfire's wing snapped off. Unfortunately, there's really not a good way to store him in the plastic tray included in the game box. Combine that with the fact that I plan on painting all the models, I needed to find a storage solution. First I looked at the Battlefoam tray inserts for the game box, while these looked cool they really only fit the base game and as such would be quickly outdated. The reviews and photos I found online of the trays in action also discouraged me as they protrude from the box and puts a ton of strain on the box lid. (why they didn't just do a standard box top baffles me).

Next up I looked at pluck foam trays to fit in my existing Sabol Bags. My problem with these is I already own a ton of them and can never remember which models go in the trays. Since I have display cabinets, I like to have my models out to look at when not in use. Trays and bags are usually only used when I need to pack stuff up to travel. (Note: having game night at your house means you don't have to pack stuff often) Not thrilled about the proposition of more trays I can't remember what goes in what meant this was not an option either.

So I started looking for a new bag just to hold this game. Lo and behold Battlefoam makes CMON branded bags. With Relic Knights on the horizon and Dark Age nagging at my interest I figured this would be a good purchase. Was I right, read on to find out.

Construction:
Just like all Battlefoam bags the case is built to take a beating. Nylon fabric with and hard plastic liner means this bag can take a hit. The stitching looks pretty tight and the strap has a nice heavy plastic handle. (Hoping the seams don't pop like on my Malifaux Bag.) This bag also features a full length zipper system. Which means you can unzip it and easily remove the trays, on more then occasion I damaged a model trying to force the trays into my Mark One Sabol Army Transport, so this feature was appreciated. There are a decent amount of pouches on the outside to store random bits and the Super Dungeon Rulebook fits nicely in the outside pocket. Like most of the bags I've seen or owned from Battlefoam the construction is pretty top notch. There are some minor issues with the stiching and loose threads.

Foam:
Battlefoam uses a rigid foam for their bags. This holds it's shape well but some people complain it damages their paint jobs. (I'm guessing they didn't properly prime and seal the minis ... but that's just speculation) I personally like it the trays don't flop when you hold them one handed which means it's unlikely you'll accidentally tip your minis on the floor. The bag comes with custom cut foam which is supposed to fit all the models from the base game and the expansion. Since all the minis come pegged for assembly the should all be exactly the same right? Not the case either I found some way to assemble my dragon wrong or the foam wasn't cut to the right shape. In either case trying to wiggle the damn thing into the spot snapped off the wing. To rectify the situation I carved deeper into the slot where the wing is supposed to fit and recessed it. This made the dragon fit a bit better into the "custom slot"  I had to print the images from their website to see where the rest of the models are supposed to fit because it's not really self explanatory. 

Usefulness:
The bag has some flaws but overall it seems like it will work for what I need it to. First up is the lack of a Super Dungeon Velcro Patch, the other bags come with a patch for their respective brands (including a game that's not out til May...WTF) but this one didn't. Not a huge deal and it's noted on the site when you order, but still a fail as there's no where to get a patch for this unless you make your own. (Yes I will probably make my own...) Second while it states on the site that the game tiles don't fit in the bag I was hoping to be able to at least get the lootimeter to fit. No such luck. If the bag was an inch or two wider and taller they could easily fit the boards in there. Third while the pouches on the outside are cool it would be better it if they fit an Ultraprobox or one of those Fantasy Flight card boxes, since ALL the cards don't fit in the slot on the tray when sleeved up. The heroes and monsters fit ok but the rest have no where to go.

Final Thoughts:
The bag is going to hold my minis just fine and keep them safe. It's solid and hopefully I'll be able to use it for some of my Relic Knights when they come out. I am disappointed however as the bag feels like a money grab from Battle Foam. It feels like they took a standard bag and called it custom. A few minor tweaks to the bag would have made it hold ALL the game components perfectly with room to expand as the game grows. Instead you get a bag that holds foam cut to the basic shapes of the SDE minis with pockets and pouches that don't make sense for the game.

If you compare the product shots from Battlefoam's site with the shots I took you can see where the discrepancies lie. It just bums me out that the second "branded game specific" bag I've bought from them still doesn't cater to the needs of the specific game it's branded for. Instead it feels more like Fruity Ohs with a Fruit Loops Label taped over the name.

As a follow up my Malifaux bag is beging to spilt at the seams. I've had it for about two years and take it with me to a weekly game night. I've never flown with it or put it through any abuse so this is a bit of a bummer. We'll see how this bag holds up.

Sixth Edition 40K - Serious Fun

Warhammer 40K – I've been slowly working 40K back into my regular gaming schedule. So far I'm pretty happy with this edition of the game. After getting over the insane price of entry (not really applicable to those of us that have been collecting forever) and the gigantic rulebook, I really like what they've done with the game. 

I like the story driven elements and secondary objectives it brings more to the game than just straight up kill everything or grab and hold objectives. The warlord traits are ok, but most of the time they're irrelevant to the game. The changes to vehicles make it riskier to run a fully mechanized list, however I own a ton of tanks and will keep using them. I have switched from rhinos to razorbacks to get some extra firepower but other wise I'm using the same lists from 5th edition. 

Recently I played a game against Tyranids and was able to bring out my Land Raider Achilles and Thunderfire cannon. Combined with a Master of the Forge on a bike with a Conversion Beamer and two squads of marines with plasma cannons, with an Assault Cannon Razorback and a Heavy Flamer Razorback I had a boat load of templates to lay down. Suffice to say the bugs didn't really do much before they were slaughtered. We called the game after 3 turns as there wasn't much left with the bugs fog slogging across the table.

After the game my opponent realizes his Genestealers have "Dormant" as a special rule which means he didn't have to walk across the table. Instead they pop out of a terrain feature. Kind of a big deal, which would have made a world of difference as they would have been in combat fairly quickly.

The game is fun and so long as I'm playing one on one or 4 player teams (2 per side as allies). I really need to get more of the company I built painted to completion, right now everything is at 3 color minimum with a few squads done to completion.

Farewell old friend

Alas poor Twinkie, your time was too short. It really bums me out that Hostess is closing. The sweet preservative filled treats were a staple of my childhood. Twinkies, Ding Dongs, Chocolate Cupcakes, Snowballs and Wonderbread will be no more.

I picked up a few boxes this morning and plan on gorging myself on the sweet nostalgic cakes over the weekend. The store I stopped at only had the three boxes left on the shelf.

To think it didn't even take a Zombie Apocalypse for these to disappear from the store shelves, just good old American greed.

GauntletCON 2012

This weekend my local store is running the first annual GauntletCON. This is pretty cool idea they came up with the showcase what the products the sell are all about and to drive intereest in the community. Essentially they have people coming in from 9am-5pm Sunday November 11th to run demos for all the games they sell. This is also a mini comic con type event as they sell comics as well.

I'll be there running Malifaux demos and the store will have special discounts on all product they sell during the con so it's worth stopping by to check it out. 

For more details check out their website and/or facebook page.

Gauntlet Con seems to have been a success. I was pretty happy with the amount of people requesting demos of Malifaux. I had a prime location near the counter so anyone buying anything stopped to take a look at the board and promo stuff I brought.

Evil Babies Unite – A quick review

Evil Baby Orphanage – I recently received my Kickstarter version of Evil Baby Orphanage, and thought it'd be a good time to post up a review. Of course I only got the base version of the game at the moment with the rest of the rewards due in January. 

Upon opening the box I'm pretty happy with the quality of the cards. Not quite Magic card or casino quality but a nice heavy cardstock with a glossy coating. These should stand up to the rigors of play nicely. Of course I'll probably pick up some sleeves just to be sure they stay in perfect condition but it's not necessary.

The box itself leaves a little to be desired. It's the same quality cardboard Wyrd packs their Malifaux minis in which won't stand up to much in the way of openig and closing the box often. Speaking of opening the box, that was tricky. The tuck box flaps are almost the same size as the box so the flap doesn't release easily and if you're not EXTREMELY careful it will rip. I had to take a small rod to fish our the tuck flap to open the box without damaging it. Not a big deal since I'll have a special box come January, but still annoying.

The rules are simple and take up two pages on a nicely printed color sheet included in the box. Essentially you're trying to collect 10 points worth of evil baby in your orphanage. You do this by placating the little buggers with good toys which you draw from the deck. If you don't keep them happy with good toys they do bad things which typically pushes babies to your opponent.

Gameplay is pretty fast, and fun. The game is labeled as semi-educational as there are some brief notes about each of the historical characters on their card. My daughter got a kick out of reading each one and asking questions about who they are. History buffs will get a kick out of the babies presented.

If you're looking for a quick game you can play with the family or non hardcore gamers this fits the bill. With my first few playthroughs I didn't find and super deep strategy to the game other then playing the correct "screw you neighbor cards" at the right point to push babies out of their orphanage.

To be honest I didn't think I'd enjoy this as much as I did and Kickstarter it for the minis. I'm pleasantly surprised with the quality of the game and would suggest picking it up for a change of pace.

Book Review - Fear to Tread

Warhammer 40K – Although I suppose it should be Warhamer 30K since this is a Horus Heresy book. Hmm ... where to start. Well, this is a Blood Angel book, written by James Swallow. I'm not a huge fan of either however, I am a fan of the Horus Heresy series and a completist so I have an unnatural compulsion to read and own all of these books. Which apparently is a problem I share with many other people, as the Black Library has taken to releasing special limited edition short novella for limited periods of time to grab more cash from those addicted to the Heresy. I have stayed strong and avoided these as I'm sure they will eventually be released in paperback  as part of an anthology (much like the audio dramas are coming out soon in the next book). Ah, and then they've decided to release these in hardcover first (like a real publisher to grab some extra revenue). Good for them I'm actually glad to see the Black Library having such success, as it means more good books (and a bunch of terrible ones, but lets stay positive).

Wow, that was quite the tangent. Anyway back to the review. The story finds Sanguinius and his entire legion sent to the far reaches of the galaxy to fight an alien menace as ordered by the Warmaster Horus. When they arrive a bunch of weird stuff starts happening (ala Event Horizon and Pandora) and the crew starts killing each other. As they go deeper into the system it gets crazier and crazier until the daemons reveal themselves as such and full scale conflict breaks out.

I like that this delves a little deeper into the Black Rage and shows that it has always been part of the flawed geneseed of the Blood Angels. Previous cannon texts have indicated that the Black Rage was a marine reliving Saguinius's final battle with Horus which never really sat right with me. If the geneseed came from before Saguinius died then how would it be tainted with what he experienced during that final battle? 

Anyway if you can get through the first 2-3 chapters of the book the action picks up and it's a pretty fun read. Slaanesh and Khorne have teamed up to lure the Angels to become their chosen. The Word Bearers have set up the whole thing and there are Space Wolves around to police the Librarians. To fight the daemons and save Sangunius they must break the edict of the Emperor of mankind. 

Some of the authors from the Black Library just rub me the wrong way. It's not that there's anything wrong with their style, I just don't enjoy it and unfortunately James Swallow is one of those authors (Nick Kyme is the other). Something about the way they write just takes me forever to read, like I'm working to enjoy it.

If you're a hardcore fan of the Blood Angels or Daemons then this is a must read. If you like the Horus Heresy series and are a fan this is a must read. If you're neither of these you'd probably be better off passing on this book as it's one of the weaker stories so far.

MERCs-like Halloween

MERCS? – Our annual Halloween zombie fest happened again this year. Ben took the iniative to create a Left 4 Dead variation using the Zombie rules I came up with a while back and generic survivors. Basically the table was set up as a 3'x6' board covered with terrain. The survivors have to run across the board to grab and objective and then run back to trigger the escape button. Easy right?

To start the survivors have no weapons. Throughout the board are random tokens that allow you to either heal or draw an item card. This is how your character levels up during the game. Essentially going from a sneak-theif to a bad ass zombie killer. The rules set is based on MERCS with movement cards and firing numbers. It worked really well and fit the bill for what we were trying to do.

Zombies are loosely controlled by a GM spawing a random number each turn and moving toward what ever they can see. If the survivors fire a gun or kill something it generates noise which overrides the LOS movement.

Once the survivors reach a set point on the board an event triggers which essentially changed the rules of the game. The instance we had was a flash flood. Which reduced movement and increased firing numbers.

The surviors died several times while moving across the board and had to be respawned by a teamate to continue the game. We made it to the objective and then had to call the game because the store was closing.

Overall it was really fun, in our post game parking lot discussion we had some tweaks we would make to the game to make it move a little faster and smoother.

• Reduce the size of the map – 6' is really far to cross when your model moves and average of 6" per turn. I think with a 4' map we'd be golden and have a shot.

• Give survivors a basic weapon – Having to run a grab items was fun, but it seriously slowed down the first part of the game and forced the survivors to make some "bad" moves.

•  Allow models to "fire and move" or "melee and move"– some spots where we had to choose to kill a zombie or run made it impossible to get away. Thematic for sure but it's more fun for players to be able to smash skulls then to run and hide.

Under the Wire - 3D SDE Completed?

Super Dungeon Explore – I was able to finish up the paint on the 3D boards I built over the weekend. The paint is really nothing more than a quick drybrush, but I'm happy with how they look. I think once I have the rest of the minis painted up in bright colors they'll pop on the rather drab board.

Given I decided to take part in the Sodapop contest Saturday morning to meet the deadline of today I'm really happy with the results. If you agree please head over to the Sodapop forums and vote for me in the Caverns of Roxor contest.


Now Entering the Third Dimension

Super Dungeon Explore – Over the weekend I had a day to myself and had planned on doing some more work on the library board I've been slowly making progress on. Well after cutting some blocks of foam to add some rooms/higher levels to the board, gamer ADD kicked in.

Rather than finish a project I got distracted by the pile of Super Dungeon Explore minis left out from a game earlier in the week. The minis are so nice looking I began to lament the flat tiles the came with the game. Don't get me wrong the tiles are beautiful and serve their purpose just fine. But they feel more like the homely girlfriend and these minis deserve a prom queen.

To begin I made a trip up to Home Depot to pick up supplies. I want to keep this small and cheap so I picked up a 4'x8' sheet of 1/2" pink foam, a few rolls of cork contact paper and a large snap off razor knife. Once I had the sheet cut down to fit in my car I made the track back home and started work.

I measured out my tiles to be 13"x13" this gave a nice 1/2" border around each tile to add some walls. With my trusty sharpie I then went about drawing the grid. After I gridded out 5 tiles I then marked them up to match the existing tiles. I stuck with the non lava side of the board for my first set. (Yes I'm probably going to make a boatload of panels, considering how easy these were to make.) 

After marking them up I went about cutting the cork into flagstones. This was a tedious process but I'm happy I picked up self adhesive cork, gluing would have added a ton more time to this project. After cutting 1" strips I used a pair of scissors to cut random shapes from the cork. Essentially they're all roundish and fill roughly 1" of space. I stuck these down and repeated the process for all five tiles. (Note if you're going to spend a few hours cutting little cork tiles invest in a comfortable pair of scissors, the tiny pair used made my thumb really sore.)

The next stage was carving the walls. Typically I use a hotwire cutter when making rocks or other pieces from foam. However for this project I wanted a specific look and opted to carve the foam with a knife. I invested in a heavy duty razor knife with snap off blades. This made the project really easy to carve as the blade passed through each block of foam smoothly. (Also through my index finger, but hey that's what glue is for.) I was quite proud of myself for measuring everything twice as it meant not mistakes on this project and no double work. In the end I spent a Saturday afternoon and evening carving and glueing down foam walls and now have 5 five tiles of 3D Super Dungeon Goodness. Next up is texturing and painting as well as adding some details but the project came together really quick and I'm happy with the results so far.

Need More Levels (Library Board Part Five)

Relic Knights – Looking at the layout I have so far it's pretty obvious that I need something else on this board. Right now it just feels flat, part of the problem with building a flexible system designed to be easy to store is the overall flatness of the layout. While I think it could work fine as it is with some additional scatter elements strewn about, it doesn't have the jaw dropping cool factor I want.

The solution was pointed out to me by my friend Ben, add more levels. Duh! This of course will solve the flat problem but will potentially then add the storage issue I was trying to avoid with this project.

Here's my planned solution.

Looking at some Super Dungeon Explore boards I found doing an image search I came across one that was a haunted mansion. Essentially the second level was just a block of foam with steps and a guardrail. I think this will solve my flat issue easily but still be ok to store. 

I think this is probably the best way to incorporate some of the rooms I considered during the brainstorm process.

To get started I took a 2" block of insulation foam and trace my 1.5" x 1.5" squares onto it. I'm going to stick with 12" maximum for the size of these as it shouldn't dominate the board. Next I cut down some 1" gatorfoam for the steps. I think this is going to work so I'll make a few more of these before I start the rail detail to be sure it will fit in a rubbermaid tub for transport.

Salamanders or a close approximation

Warhammer 40K – My latest large scale commission is in full swing. I finished up the three drop pods and ten terminators last week and delivered them to the client. I'm happy with how the paint scheme turned out, rather then go with the "official" Christmas green color I chose to go more of a muted lime green with orange and brass accents. I think they really pop with this scheme.

Sometimes an army scale project like this can be daunting. Over the years I've tried various techniques including painting one color on every model in the army and then moving on to the next until they're finished. This time around I decided to stick with 10 man squads. This would allow me to quickly focus on painting them to a tabletop standard as well as allowing my client to pick up each squad as it is finished and get them on the table.

Assembly line is really the best way to paint groups of models that are the same color. The models were provided to me primed and assembled, so I was able to get right into painting. A while back my mother-in-law found a great deal on the old GW foundation paints from a store that was closing. As such I had a bunch of pots of rather odd colors I don't ususally use. Of course the paint needed to be thinned out and refreshed as the old Foundation paints were thick to start with and old stock tends to separate a little. After adding some agitators to the pots and thinning them down I was ready to go.

To start I base coated each model with Gretchin Green, a weird sickly green color. Once that dried I gave them a wash with Thraka Green. While I'm speed painting like this I keep my light close to the table to speed up the drying process. By the time I finished the tenth model the first was ready for the next step which was painting the black/grey areas. I found that painting any black areas with a dark grey and washing with black gives a nice result that has a little depth. After the grey was dry I went back through and painted all the silver metallic bits, then went through and painted the brass. With that done the models are to a three color minimum. My client wanted a little more than that so I followed through and painted the orange trim and eyes, then the bone and parchment parts. After that was done a quick wash of black on the silver and grey bits, a wash of earthshade on the brass and these are ready to go. 

The next step once these are dry is to apply the decals. This step can be a giant pain as the salamander decals don't like to lie flat on the shoulder pads. A small cut at the top of the decal helps to allow it to curve with the pad. I also like to use mirco sol and miro set when doing decals. I was of course out of it at the moment so white vinegar works in a pinch. This helps to soften the decal so it "melts" into the pad. Once the dry I go over them with a coat of clear gloss varnish. This helps to hide the edges of the decal and gives the pad a little more pop. 

Baseing was a simple matter of brush on super glue. Dip in my box 'o sand, litter and random detrius. Shake off and paint with a dark grey. Drybrush lighter grey, repaint the edge to clean it up and they're done.

I use Kryon Matte finish to seal these. It gives a nice level of protection without being shiny.

So start to finish I was able to paint up (3) drop pods, (2) ten man tactical squads, (1) ten man terminator squad, (2) rhinos, (2) dreadnaughts, (4) multimelta marines, (1) terminator librarian, (1) captain, (1) chaplain and Vulcan over the course of two weeks painting from 9:30pm – 11:30pm every other night.

Paid in Full: Commissions - How much is your time worth?

Random – Lately the number of inquires I've recieved about commission work has dramatically increased. Many of these questions have been about how to determine a price when doing commission work. So in an effort to answer these questions for the larger population, here's the basic principles I use when putting together a quote.

1. How much is your time worth? When considering doing "craft" projects that you intend to sell to others the first thing you need to consider is how much is your time worth. For the most part you're not going to make $16-$30 an hour painting models or building terrain. Even when painting to a Golden Daemon or Crystal Brush winning level the amount of time you put in usually won't equate to "real job" money. Most gamer's won't pay more to have a model painted then it cost them to purchase so keep that in mind when putting together a price. Also remember if you have a wife and kids or girlfriend your hobby time is probably limited. When I started this site I was between jobs and had much more time to build and paint stuff. Now my time is limited so it's important I enjoy every project I take on and be as efficient as possible so I'm not working for pennies an hour during my free time.

2. What are your material costs and how do you recoup them? Paint, primer, glue, sand all cost money. Good paint brushes and glue cost more. While it can take a while to burn through a pot of paint, you have to consider the costs when figuring your price. One thing I've instituted is buying new pots for army scale projects and billing them as a line item. Once you're done with the project your can give the remainder to your client in case they need touch up or add models they don't need or want you to paint.

Terrain Projects can get tricky as sometimes you use found materials and other times you need to buy foam and other raw materials. Most of the time you're going to buy in bulk and have a bunch of stuff you need to store. If you have limited room you might need to invest in space to store that stuff. Right now I'm not quite at that point but it's getting close.

3. What are your customers expectations? This is a big one. Some customers just want a three color minimum. While other might ask for table top quality expecting to be able to enter them in a juried contest. Managing those expectations and delivering as promised is huge. I've heard many horror stories from painters about unreasonable clients that make requests well beyond what the initial request was and then want to pay less because the quality is what was expected. On the flip side I've also heard numerous stories of painters that send over a quick shot of the base coated model only to have the client "love it and want to know how quick it will ship." That second one is rare but important to remember as some clients dont' want you best work. They just want some color on the models. Knowing this you can save yourself a ton of time.

4. How are you going to get it to the client? Nobody considers shipping costs. One more then one occasion I've  had to deal with customers complaining about shipping, "DUDE the flat rate box is only $5, why does it cost $20 to ship to me in Antarctica? You're trying to RIP ME OFF!" You also see this all over several companies forums. The reality is shipping is expensive, foam and packing materials are expensive. Tracking and insuring packages is expensive. And even it you do everything right the post office, UPS or Fed Ex will inevitably screw up on a one-of-a-kind rare product. It happens, sending boxes across the country or world has risks. Most of the time it's not an issue but when it is will be the one time you didn't insure or track a package. C.Y.A. 

While the post office and FedEx provide free boxes the packing material is not free. Even cheap foam is a $1-$5 a yard minimum. If you're shipping painted models wrap them in foam and pack them well. Otherwise it's likely to be damaged during shipping. For an order of several models you can quickly burn through a large amount of foam and tape. So figure in the cost of shipping and add a few dollars to cover packing materials otherwise it will eat into your already tight bottom line.

5. Don't get burned. When painting models this isn't as big a deal as if you don't get paid keep the model and resell it. So long as it's nothing to obscure you should be able to get at least 40-50% of the retail cost, more if you're willing to wait. But terrain projects are another beast entirely. Custom terrain is hard to sell once its built. Particularly if it's custom to specific client. After getting burned a few times I put forth a 50% nonrefundable deposit. That way if I have to go buy a bunch of supplies for a project I'm not going to be out of pocket if the client changes their mind or "is broke this month bro."

6. Be transparent. Have examples of your work and the various levels of quality and pricing tiers available. Put them out there for the work to see. Eventually people will start to connect with your work and ask about pricing. For example for a table top quality miniature from a skirmish game I typical charge by model size: 30mm - $8-$12; 40mm - $10-$15; 50mm - $15-$30. This gives a good starting point. But for an army level game it's unlikely you'll get that much per model. At this point most people want a "lower table top quality" which falls more in line with the 25mm- $2-$3, and goes up from there.

For terrain projects it helps to come up with some designs you can quickly replicate and make a bunch of them at once. Assembly lines are good for managing time and if you make something that can be used for several systems you diversify your client base. For example the swamps I sell in the online store I typically make 6-10 of them at a time. Since they use water effects it's better to mix a larger pot of it and pour all at once than to make small pot and have a bunch of waste. Having an existing stock also lets you focus on other projects and have a reference point for custom orders.

Being consistent helps you to manage your time and be able to quickly quote a price to a potential customer. I hope this answers any questions for aspiring painters and potential clients.