Mechanically Inclined

Rogue Trader – I'm continuing my quest to build up a rogues gallery of models to use in the Rogue Trader RPG I'm running. I found some unique models to represent Tech Priests and Explorators in the Iron Brotherhood line from Microarts Studios. Shipping was pretty quick considering they're coming from Poland, and the models arrived well packed in a sturdy box.

Opening them up the models had a fair amount of flash and getting the arms to fit was tricky. However getting things from a small boutique shop it's to be expected to have some extra clean up. On the tracked model which was resin there are a few minor bubbles that I should be able to fill of minimize their appearance. The metal models are pretty crisp with good detail. The remind me of better quality early Citadel minis. Minor gripe about the arms on the models with rifles, the ball joints don't line up and require a bit of bending to get a solid join. 

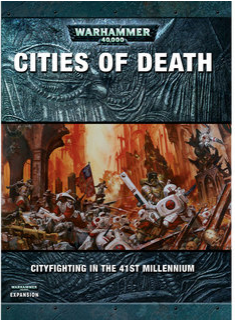
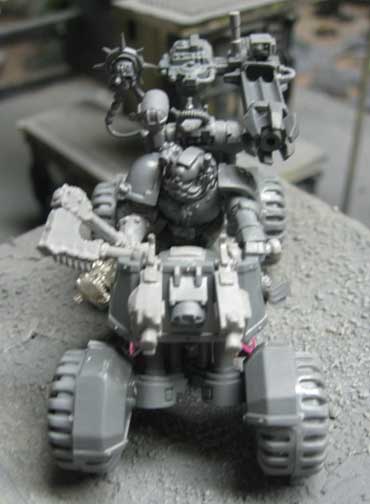
Not content with the look of most of the minis straight of of the box I'm doing some conversion work to make them fit with the look I'm trying to achieve. I'm most exciting about the tracked unit as I have been meaning to create a heavy weapons trooper for my team of adventurers. Going through my bitz box I was able to find some Tau gattling guns which I mounted to either arm. I added some pieces from the Cities of Death models to build a generator unit on the back and will add some cabling to tie it into the guns. I figure creating a generic looking gun mount will allow it to be flexible and count as whatever the team decides it needs at the moment.

The basic troopers with rifles are great out of the box. Aside from the minor issue with the arms I just had to pin them to the base and clean some minor mold lines. I think these will count as Tech Guard or generic Explorators

The other models came with some oddly shaped mechanical arms. I'm not really feeling them and am in search of some bitz to give each of these models more character. I feel one of them at least needs a servo arm and or Mechandrites. 

Nemisises, Nemisii ...something like that

Rogue Trader – Continuing on the 40K kick I've been on I've been building more models. Some of these could be used as NPCs on the my Players Groups vessel and the others will represent a Rogue's Gallery or recurring villain.

First up is the rival rouge trader. This is based off a Reaper model with some minimal weapon swaps. I think the modified plasma pistol/gun comes off as pretty lethal. I armed him with a Xenos blade which to me screams bad guy or at the very least morally flexible. To accompany this villain I created twin combat servitors each wielding a plasma pistol and chain blade. If you had vast sums of money and resources at your expense would you really have a walking corpse that looks the part as a body guard? I think not which is why these servitors are modeled after some favorite servants/mistresses that wronged the trader in some way.

The next model can double as a house agent or another trader if need be. I really like the model as it came stock and didn't do any modifications. The watch/compass fots so well with the naval feel I wanted.

I found the Chronoscope Crime boss to be a great fit as well with minor weapon swaps he can play a variety of potential "boss" characters or a brawny member of the crew.

For the Rogue Trader I chose a Privateer Press model and made a weapon swap. The look an feel of these fit really well with the piratey/naval look portrayed in the Rogue Trader books.

The mechanic doesn't really fit in with the established Mechanicus fluff and I see her more as a technosavant maybe a psyker with and affinity for machines. Or a random rouge fixer. In some of the Necromunda fluff there's reference to all types of individuals in the underhive so it makes sense that real mechanics might exist.

I really need to track down some guitar wire to finish these off, unfortunately all the music stores  near me have closed up shop. 


Crewing a Rogue Trader Vessel

Rogue Trader – I recently spent some time creating models for my upcoming Rogue Trader Campaign. While it's not necessary to have miniatures to represent the crew and the various NPCs they might encounter, I think it will add to the experience. I also might reuse the models if I can convince my group to try out Inquisimunda. I've been following this thread in the background for a long time and think the idea of playing Necromunda with characters you generate like a RPG sounds like a ton of fun. Of course you have to have a group in the right mindset and someone to act as a GM, but it might be the natural progression of the game I'm running.

Digging through my bits box I was able to find some suitable bits and pieces to make some characters. I've found the Empire Range from GW has plenty to work with for the base of these types of characters. I also have a hefty collection of Necromunda models that I could draw from to build what I need.

First up is the Navigator, I used the Empire Battle wizard as a base and added a different head and some other techy bits. I'm happy with the results so far and need to do quite a bit more work on the paint job. Blue is the color typically associate with psykers in the 40K universe so I stuck with the traditional scheme.

Next is the Void Master, this was just a simple weapon swap with the Underhive Scum model. I've always liked the character of the model, just looking at him you can easily imagine how his life took a downward turn. He seems to have just enough of a mean streak to make an effective Voidmaster.

The Arch-Militant was also a simple head and weapon swap. I used the old model of Iron Hand Straken and snipped off the head and plasma pistol. The replacement head is from the Empire Flagellates set. The player who created the character insists on playing an insane raging psychopath, so I figured given him an iron mask made sense. That way he can bite anybody.

For the Seneschal I used the old Imperial Missionary Body and swapped out the arms and backpack. For this character I see him as running errands for the captain and keeping track of the shipping dockets. Rather than doing a data slate I thought a book was more characterful. I positioned the arm so It looks like he's running and firing behind him.

The fiery Missionary was interesting to build. I used the Flagellate body as a base and added a flamer and the book I snipped off another model. I like how creepy the final model looks, definitely not someone you want to get in discussion about the merits of Xenos tech with.

I also made a generic Voidfarer model. I imagine this will be an NPC that sets the seeds of each adventure in motion. I used a Tau body for the suit and added a grizzled head with an ancient looking gun. Holding a map seems to be the best way to start a quest so that's what he's holding.

I still have to find some models for the Rogue Trader, Explorator and some rivals but I might find more inspiration in my bitz box. 

Let's Pretend!

Rogue Trader – I've finally read through the full rulebook and am preparing to GM for the first time. In preparation I've listened to numerous play sessions and have read through the various prepared adventures. I'm hoping the game will run smoothly, but I'm a bit nervous about my player group and them jumping to far from the story. Making stuff up on the fly shouldn't be to hard but I really want to use all the material I have.

The other night I got the group together to build their characters. I really like the origin path system as it easily gives the characters a backstory. I had the players start with their career and work backwards. Most of the players just did what sounded cool without reading the stat modifiers. It was easy to do as a group because I could just read off the modifiers after everyone drew their path.

After everyone was done with the basic character stats we have: Rogue Trader, noble born from a failing Dynasty; an Explorator on the run form the law; a trigger happy Navigator; a Seneshal manservant; an angry imperial guard deserter as the Voidmaster; a xenophobic Missionary; and a bat-shit crazy Ex-Militant. 

This should be fun. If you want to learn more about the system check out this link.

On the painting table ...

After a several month hiatus I was able to get my painting table set back up again. Although I have several projects in various states of completion I wanted to start fresh with a few models that have been waiting in the wings for a long time.

Currently I'm reading The Gildar Rift, which is a Warhammer 40K novel that deals with the Tyrant of Badab, Huron Blackheart. I'm enjoying the book and have always liked that character, and if the rumours on the internet are to be believed we might get a Chaos Book worth playing later this year. So I dug through my collection of unpainted 40K models to find Huron Blackheart and Lucious the Eternal. Both models I picked up prior to the Finecast mess, so they're still metal.

I began with putting down some base colors and washing the entire model. I've found with character models like this with so much detail it helps me to be able to pick out what's going on with the model. For example, the Blackheart model has a ton of "combat damage" and strange breaks in the armor as well as tons of odd pipes and cables. By washing over the model with the basic tone I can see more clearly what things are. This is particularly helpful in picking out the details on the model. After doing this however I realized he's missing his thumb, hopefully I'll be able to find it or a suitable replacement so I can continue with the model.

Determined to actually get some painting done the next model I pulled out was Lucious the Eternal. I began with a hot pink base coat and washed the entire model with purple. As the wash was drying I realized why I never bothered to paint this model. He was my favorite character in the third edition book and I had built my own version. When this was released I picked it up right away, put it together primed it and put it back in the box. The model is just plain ugly. The whip points straight out there's no implied motion, and the whole thing feels bulky and fat.

Dismayed by my luck so far, I put together and primed Troll Potion. This is a special CMON model that I plan to use as a Desperate Merc for Malifaux. The model is all one piece with minimal flash, so clean-up was breeze. After the primer had dried I went about blocking in my base colors. I'm a big fan of green and black, and try to work this into most of the models I use with my Resserectionist forces. Being as I'll probably use her with Seamus I went with red hair and pale skin. 

Given the obstacles and set-up time I'm pretty happy with the progress I was able to make back at the table again. Hopefully the next session will go a bit smoother and I'll have real progress to show.


Working in the Stockyard

MERCS – I've been working on building a dedicated MERCS table. Currently I'm feverishly working on building a massive amount of ISO shipping containers. My goal is to have at least ten of these built and painted for games of MERCS. 

What I like about these is the versatility they provide in setting up a table. They stack easily and can add a level of elevation that is consistent and simple. With MERCS using cards to measure it becomes tricky to use more complicated terrain as you can't get the card inside of buildings or around corners etc. 

To go with these I've picked up a Zuzzy mat. These are really great if you don't have space to store a full size table. The mats are nicely detailed and fairly simple to paint. 

Assault Troops

Warhammer 40K – I've been working on some Assault Troops with out jump packs. These models will serve as troops when I decide to use the Blood Angel Codex as well as when I choose to field Tyberious as he allows tactical squads to swap their bolter for chainswords and pistols.

To give them a hardened veteran feel I'm using the Maxmini steam knight heads. I really like the look of the heads and wish I had picked up more of them. I've been trying to give each marine in my force a unique look so that they stand out as heroic individuals rather that cookie cutter power armor guys.

Using a mix of the available bits I combined some of the Khorne Bezerker torsos that have ammo straps. I also used several parts from the commander sprue. 

Having run out of my GW purple ink I've been experimenting with a suitable replacement. The Leviathan purple wash is nice but I'm having a hard time replicating the deep purple hue the old ink gave. I recently picked up some of the Reaper purple ink and it's closer but not quite the same. I think I'm going to have to use a combination of the two to achieve the desired effect.

Pump up the sand.

Wow that title was a stretch. Working on the desert terrain for my new 40K layout I realized that although it looked pretty good not having a centerpiece just wouldn't do. To the box o'junk.

Digging around through the recyclables I found a parmesan cheese container that led to inspiration. The ridges cleverly concealed beneath the plastic label looked to me like some type of holding container. Buried at the bottom of my box of unfinished bases I found a hill that would serve as a solid base.

From there I used some Hirst Arts blocks to create a foundation. After gluing them in place I measured and cut some foam core for the walls. Once that was in place a carved out a spot for my container and glued some Hirst Arts pipes to the outside.

For the roof I wanted to create a corrugated tin style roof. I'm reading Purging of Kadillus right now and there's a scene in which the scouts campo out on the tin roof of a mining complex. So I wanted to create something similar to what I saw in my mind's eye.

After the piece was finished I covered it with some watered down wood glue and sprinkled debris to give it a desert texture. Painting follows the same as I did with the previous desert terrain. All in all I got this project nearly finished during the Oscar's and I think it turned out better than that horribly long drawn out award's show.


In the desert you can remember your name.

I've begun creating some new terrain pieces for my large table (4'x6'). While I have several city blocks built for this table, after a while it starts to get a bit boring using ruins every game. The terrain I've built for Malifaux works fine on the smaller tables, however when spread out on a larger table it tends to look a bit sparse. 

I began by cutting green foam with a hot wire cutter. This is the easiest way to create rock formations that resemble something you'd see in the American west. Simply move the cutter in and out to create the striations in the rock face. Once these are cut and shaped, I mount them to MDF with wood glue.

To match the texture of the table I use a textured wallpaper as a base. This gives an interesting look without creating so much texture that models won't stand properly. Around the edges of the rock formations I used wood filler to createdebris piles where material would naturally collect. One the shape has been built up a give it a good coat of wood glue and cover it with a mixture of kitty litter and sand.

After that has dried overnight shake off the sand and use a dust whisk of soft bristly brush to knock off any loose material that didn't come off when you shook it.

I like to use Behr paint and primer for terrain projects. They can color match any of you model colors and have a good selection of the board. For desert terrain I like to use a terracotta color as a base. This can then be dry brushed with a light brown and cream to mimic the formations you find in the American west.

To finish off the project I like to apply some lichen and dead looking tall grass to areas that scrub may take hold. I use Tacky Glue or Super Glue for this. Either product with hold the material in place, but I've found that Super Glue dries faster and leads to better results for the tall grass. After everything is dry I spray it with Krylon Low Odor matte finish. This gives a durable coating that doesn't look glossy.

On the Painting Table ....

Warhammer 40K – I finally have my Storm Raven kit assembled (for the most part). The kit is pretty straightforward with fairly well detailed instructions. Of course I still glued one part on backward (The lesson here is to dry fit EVERYTHING), however with a bit of effort I was able to pry the tail fin off and glue it on the right way. The one major annoyance I have with the kit it once is assembled the top gun assembly can't be removed.

I decided to glue the hatches shut, in my experience they will get floppy over time and be prone to breakage. I imagine if you wanted to magnetize them it'd be cool to have opening doors. 

So far I've almost finished painting the cockpit interiors and have a base coat on the body of the ship. I added the raven icon from a set of Forgeworld doors to the side of the ship. I think I'll probably use decals for the rest of the insignias.


Getting the most out of your bits

Warhammer 40K – I've been working on finishing up some terminator squads to use in the Badab War campaign I'm running. One of the special characters allows you to take Lightening Claw Terminators as troops, so that's what I built using the Assault Terminator box. The nice thing about the five man box is that it provides you with either weapon option (Thunderhammers or Lightening Claws). The down side is the only the extra arms are included.

This is where the Assault on Black Reach Terminators come in. You can usually find them for a good price on ebay and with a few simple cuts you can remove the lower portion of their arms. The next step is cutting of the top of the Thunderhammer arms and glueing them in place. It takes a bit of trial an error to cut off the right amount and get a good fit. The results are an easy way to get 10 assault terminators with different weapon options using just one of the kits and some readily available bits.

I also wanted to add some Cyclone Missile Launchers to the unit. Unable to find the bit for a price I wanted to pay I did some digging around and found these. The price was right for two of them and they fit nicely on the backs of some Black Reach Terminators. While not as detailed as the regular kit they still look great on the field and you get two of them.


Badab War - Expansion Reviews

After the initial week of the campaign I'm looking into adding some of the 40K expansions into the mix. These supplements add new levels to the game and allow for interesting choices. While not necessarily the best for pick-up games, planning ahead for their inclusion into a campaign is the best way to use them in my opinion. That said let's look at what each of the expansions has to offer.


Cities of Death
Released near the end of 4th Edition the Cities of Death expansion revisited and revised the original City Fight ruleset. This expansion also brought stratagems into the game. Stratagems allowed players to give units or buildings special rules to reflect the special forces aspect of fighting in an urban environment. This expansion also modified the way buildings work (and was subsequently incorporated into the 5th Edition ruleset). For campaign games this ruleset is a great way to contest urban environments and makes for a very different style of play than a typical "open field" style game.


Planet Strike
The big release a few summers ago, this expansion saw the release of special terrain elements in the form of numerous plastic kits. Playing a Planet Strike game requires quite a bit of prior planning on the part of both players, as your force organization changes dramatically depending on if you are the attacker or defender. Also special terrain such as fortifications, craters and defense lines are a necessity. For campaign games  this ruleset can be used to simulate boarding assaults as well as planetary invasions. Given the nature of this style game players will need to be notified well in advance so they can prepare.

Spearhead
The vehicle expansion was released in White Dwarf over the summer and a pdf of the ruleset is available for free on Games Workshop's site. Like the other expansions this ruleset dramatically changes the way the game is played making tanks and squadrons scoring units. You also play using length of the board rather than the width. While this seems like a fun thing to try, not every player has access to a lot of tanks and as such requires much planning to set up a game. For campaigns this is a great way to simulate a force charging across the wastes to assault a position. Again given the nature of this type of game players need to be notified well in advance so they can prepare.

Apocalypse
This expansion removes the force organization chart so players can use any model in their collection as well as super heavies. It requires a larger table and takes a relatively longer period of time to play a game. Playing a game requires a significant amount of planning, space and time. For campaigns this is typically the final game allowing all players to field what they want and all play together. Of course if their are titans or other super heavies on the board, you may spend most of your game setting up models only to remove large swathes of them before you even get to move. 

Imperial Armour
Volumes 9 and 10 provide the meat for my current campaign. Not only do they include special characters and army lists, but also a well thought out campaign system. Also included in volume 9 are rules for boarding actions. This is a cool mini expansion that adds stratagems, and special rules to simulate fighting onboard starships. 

Badab War - Campaign Begins

Warhammer 40K – Sunday was the first day of the Badab War campaign I'm running with several members of the Paperbag Warriors. We started earlier than usual and began the campaign with a draft. Two of the players in our group insisted on playing a specific chapter from the Imperial Armour Books, and luckily one was a loyalist and the other a secessionist. These two players became the captains of theirs respective teams and than took turns drafting players for their side.

The scoring system is pretty simple winning a 1500 point or higher battle earns a team 2 VP, wining a Kill-team or small scale 40K game nets the winner 1VP. The campaign will last 5 weeks playing every other week. This makes scheduling easier and also promotes finishing off models and completing an army.

The Badad War was significant event in the 40K timeline that happened relatively recently. A group of space marine chapters tasked with protecting a remote area of space have a dispute with some of the local system administrations and declare independence. This rebellion ultimately forces the High Lords of Terra to react and send additional chapters of marines to the system to put an end to the rebellion. This minor civil war is the basis for the campaign. Forgeworld has produced 2 books that provide extensive background information and army lists which make running a themed campaign easy.

This event was one of my favorite stories from the old 40K compendium, and I painted (and since have lost) several variations of the old-school chapter schemes detailed above using the old hunch-backed beaky marine kit. Forgeworld has taken some liberties with the old background to make it more "realistic" and I've so far really enjoyed the books. Bell of Lost Souls also did their own variation of the campaign a few years ago.


Snowed In

I had to cancel my regular Malifaux night due to the 5 inches of snow that got dumped on Metro-Detroit yesterday. Luckily, my good friend Chuck (paperbag4) has a truck so he came over to play some 40k.

We played a 1500 point Capture & Control mission. He ran a mechanized Imperial Guard army, lots of tanks and veteran squad as troop choices. I used Space Marines, trying out a list that featured the Landraider Achilles, Master of the Forge on a bike, three Tactical Squads with Razorbacks and a total of 6 Lascannons.

The game was a draw on turn 7. I was really concerned about facing that many tanks, but after playing out the game it wasn't that bad of a match-up. The veteran squads were really difficult to deal with given the amount of special weapons they can safely shoot from the top of a Chimera.

After the game we tried out Cthulu Dice, which turns out to be a very fun version of LCR that allows you to target specific opponents. Played a dozen or so games in under an hour and enjoyed the randomness of the game.

Getting Organized

Warhammer 40K – Following through with one of my resolutions, I've begun organizing my space marine army. I've found that when dealing with a large number of models like this it's best to organize what you have to develop a plan of action. I've assembled, primed and base coated most of my models. When working with GW stuff I tend to put a quick base coat on every model after they've been assembled. It's a habit I developed from playing in 40K events years ago. The old (maybe still in effect?) rule was a model had to have at least 3 colors on it to participate in an event. While this works fine to avoid having grey or black models on the tabletop it slows the process for finishing models. From a distance base coated models look ok and it's easy to slack off and never finish them (hence this huge cabinet of half finished models).

After sorting through the models I have built and re-reading numerous source books I'm only one squad of tactical marines short of having a full company. Of course in addition to the standard company I have numerous squads that would be part of other companies or support units. Rather than attempt to build an entire chapter I think I'm going to flesh out the captains of each company and reuse the basic components when I want. To keep this flexibility I'm not using the codex company color identifiers, this keeps this fluid and will also allow me to use multiple codexes depending on what I feel like fielding.

Reading through the Blood Angel codex I think this will be the basis for at least one of my companies. Using that book gives you numerous possibilities for varying your force and shoehorning in some of the traits that were left out of the current marine codex.


No Wonder It Cost So Much ...

Warhammer 40K – While waiting to hear back from Forgeworld regarding the damaged parts of my order I started working on the items that weren't broken or missing vital parts. The shear size of the the excessive resin is pretty daunting to deal with. At first I though they included tank traps as part of the sprue. I'm not sure what the though process is in attaching a delicate piece to a giant block of resin, but it's not good. 

After a few hours of cutting and sanding I was able to assembly the bodies of both dreadnoughts and the landraider. I'm pretty happy with all the kits once they're assembled. Still waiting on the banner poll for the venerable dread, but overall they went together easily and had very little warping.

WIP – Master of the Forge

Warhammer 40K – I've been working on a conversion to have a Master of the Forge on a bike with a conversion beamer. I based the chassis on a tutorial I found on Bolter & Chainsword. I made a few modifications to the gun mount, namely using a wench section from the Vindicator kit as a weapon mount. The hole in the wench was also exactly the same size as a teleport homer pipe so it was easy to snap it into place. For the conversion beamer I'm using a Necron heavy guass cannon. Once the model is painted I'll put some yellow or blue neon rod in the weapon barrels.

The rider used the basic bike legs, torso from the vehicle sprue, Dark Angels techmarine head, apocarthy backpack, tentacle from a defiler and servo arm from a servitor. I had to remove the one of the sensors on the backpack to fit it on the bike. After carefully cutting off the offending piece I mounted the sensor to the cannon. For the servoarm I carefully bent the tentacle and heated it under a lamp to hold the curve. I then pinned it to the backpack and attached the servitor arm to the end of the tentacle with a pin. 

I'm looking forward to using this model as it will allow me to field up to 6 dreadnaughts, as well as being a cost effective mobile weapons platform.

Customs ... how I loathe thee

My loving mother was kind enough to buy me a bunch of Forgeworld stuff for Christmas. Much to her dismay what the package arrived it was in a blue plastic bag and the models were just dumped into the bag along with a destroyed box. As she ordered it just in time for Christmas she had no idea what to do. Not having any idea on what it was she actually bought she had no way of knowing what was missing or broken. 

Of course when I opened the box to find a Babab War book, Land Raider Achilles, 2 Dreadnaughts, Captain Korvydae, Damocles Command Rhino, and Raven Guard Doors for the Land Raider and Rhino I was thrilled. Then of course she explained how it arrived and upon closer inspection I noticed an immense amount of damage.

The book looked like it had been chewed up in some type of machine and several of the parts were missing for numerous models. Many of the parts were broken to the point of being unfixable.

I have attempted to contact Forgeworld regarding the damage and would hope that the package was insured since it was several hundred dollars worth of product. Since they just got back from the holiday break I hope to hear something soon (and hopefully positive). Be forewarned this is part of the danger of shipping or ordering things from overseas.


After a bit of a wait, the kind people at Forgeworld helped me out. They replaced all the missing or damaged parts with COMPLETE new models. Customer service like this really make a company stand out. 

Weathering the Storm

Warhammer 40K – Sunday was supposed to be the first gaming session in the newly remodeled game room. However due to a snow storm most of the guys were unable to make it out.

Luckily Brian (paperbag fox) braved the weather to get in a game. We decided to play a quick 750 point game of 40K. After setting up a ruined city overgrown by the jungle we rolled up annihilation with corner deployment.

I don't remember his exact list but this is one of my stan-by lists, it takes advantage of the stock unit choices:

• Captain with bolter and hellfire rounds and a power axe

• 5-man tactical squad in a Razorback with lascannons

• 10-man tactical squad in a Rhino with flamer and missile launcher 

• 10-man tactical squad in a Rhino with flamer and missile launcher 

• Assault Bike with Multi-melta 

The game mostly went my way due to clever deployment and combat squads. I was able to cause his two big mobs of boyz to route after heavy casualties. His Warboss decimated a squad, but they were able to hold out long enough for the calvary to arrive and gun down the massive beast.

Small point games don't play to the strengths of the Orks. It probably didn't help that he had quite a few points tied up into some Killa Kans that didn't make much impact on the game.

Back to the 41st Millenium

Warhammer 40K – After helping my cousins build and teaching them the basics of painting Orks and Space Marines, I was once again bitten by the 40k bug. After digging out my Twilight Raven marines I realized that I pretty much abandoned the project and have quite a bit of work to do before the company is completed.

My goal with this army was to build a complete company of marines and eventually move on to build the entire chapter. Given the skyrocketing costs of new GW product, building the chapter is probably a pipe dream however I have most of the raw material to complete the company and have a few additional elements.

Currently between commission work I'm sorting through what I have built and what needs to be painted. Each marine has a scroll on the base for their name. The names were chosen using the scientific names of various bird species. Looking at the decal sheet I made ages ago it shouldn't be a problem to have 150 or so marines each with their own unique name.

Once I have them sorted into 10 man squads the next step is to denote squad numbers and markings. Not only is this helpful for keeping track of them on the table but it's also useful for building lists. I keep a composition book with multiple lists built out so when it's time to play a game I just look for what I'd like to play and am ready to go. I've also gone through and built numerous 750 lists that can be combined together quickly and easily to create a 1500 point list.

The great thing about a DIY chapter is you can pull from whatever marine codex you'd like reusing the basic building blocks that are consistent throughout the various marine codexes. I've loosely based my chapter on the Raven Guard, however if I feel a different codex will fit the feel for a force I'd like to build I can easily adopt that into my own canon. 

For example Raven Guard used to be able to do a jump pack heavy list with a special command squad. The current generic marine codex doesn't allow that option. The Blood Angel Codex does however allow you to take assault squads as troops so I will use that when I'd like to play all my jump pack marines.

The next challenge, besides painting the remaining models I have will be to right an Index Astartes article detailing the background of my chapter. I'll need to put a lot of thought into how I'll write the background information, so they remain as flexible as I want (ie would marines riding giant birds as a proxy for thunder wolf calvary be ridiculous...)