Wyrd wants you to support your LGS! Win Stuff.

This February Wyrd is giving you chance to win a Limited Edition Lord Chompy Bits just for supporting your local game store. Check out the flyer at the right for details. (Click for a larger version)

I think this is really cool on their part as Local Stores are really where players learn about new games and meet new people to play with.

I know most of you probably feel like you get a better deal buying from online discount stores, but with the new shipping increases you're probably playing close to the MSRP when it's all said and done. Why not just pick up what you need from the guy/gal that's providing you with a cool place to play and meet other gamers?

By the power of Greyskull ...

Malifaux – Yes I know this is a kit for Warhammer Fantasy. No hell did not freeze over, I haven't started playing that game. When I saw this kit I immediately thought of Nicodems Observatory from Rising Powers. Of course shortly after that I though of He-Man. Then I looked at the price and giggled. Much like most of the kits from GW the price is higher than average but you are getting a nicely detailed hunk of plastic with optional parts (and skulls everywhere). 

Unboxing the kit you have two solid parts for the base and a few sprues with the rest of the details. I could see using some of these parts in other projects and will probably check some bit sellers to see if they have any extras. The instructions were very detailed and easy to follow and the kit went together smoothly. In fact I think it took me more time to remove the mold lines than it did to assemble the entire kit.

I opted to leave the observatory and tower ramparts unattached so it can serve a dual purpose. Other than that minor option there aren't any extra parts in the kit. Which is a bit disappointing as most GW kits have a ton of extra stuff that can be used other places.

Overall I'm happy with the kit. It looks imposing on the field and takes up a decent amount of space. I'm slightly disappointed with the number of places models can stand on the piece, for some reason I though the stairs and broken walkway were larger than they are. Combining this with some Citadel Trees, Wyrd Hanging Trees, and two Garden of Morrs should be more than enough terrain to fill a 3'x3' graveyard themed board. I know I could probably build all of this for way less and have it look just as cool, however I'm experimenting with the durability of these plastic kits. Dragging my desert board back a forth from the game store every week has exposed some of the minor flaws in scratch built terrain. Granted three years of constant use and shuffling is pretty solid for a terrain set I want to see what I can do with some solid plastic kits.

Putting Plastic Together ... fumless fallacy

Over the weekend I sat down and put together the blevy of plastic kits I've had sitting around waiting to put them together. While it's probably counterproductive to put together more stuff to paint before I finish my existing project load I needed to take a break from painting for a little while.

When assembling plastics it's important to use the correct glue. For most model kits the correct glue is plastic cement. (Super Dungeon Explore is an exception to this) Plastic cement causes a chemical reaction which softens the plastic and welds the two parts together into a solid join. This is more durable than a standard glue join and the models are unlikely to come back apart without serious repercussions. (notably truly broken pieces).

It's been some time since I had an assembly line going to put together a bunch of kits at one time and I forgot how messy plastics can be. Shaving the mold lines and sprue nubs left my workspace covered in plastic shavings. It's a good thing I set up in the basement where it's easy enough to sweep up the mess. The lesson to be learned here is to put a drop cloth down when doing mass assembly. It's also helpful to keep the shop-vac handily.

When choosing a plastic cement there are a ton of choices available. I prefer to stick with the "non-toxic" blue testors brand in the metal tube. It's cheap and easy to get and does a great job. The only problem is the tip is far from accurate and to much pressure on the tube means glue everywhere. I've heard there are better glues that only require a single drop with a pin to hold the plastics together. I have to assume they are also fairly smelly and toxic like the red tubes of testors. 

Not feeling adventurous I stuck with the stand by blue tubes. Just because it's labeled "non-toxic" does not mean it doesn't smell. In fact the glue I was using had a very strong citrus odor that lingered well beyond the time it took for the glue to dry.

The next important tool to have on hand are a pair of side snips or sprue snips. These allow you to easily remove the pieces from the sprue. Don't twist the pieces off or try and carve them off with an exacto blade, you'll wind up damaging the part and probably gouging yourself with the blade. A good pair of hobby snips will cost you less that $15 and will save you much more than that cost in potentially damaged models. You'll also want to have some fresh exacto blades around to scrape off the mold lines.

With the proper tools in hand I went to work. Over the course of a few hours each night I was able to assemble Skullvane Manse, an Imperial Stongpoint, Dark Debts, Mr. Tanner, Mr. Graves and Santana Ortega. Next up I'll review these kits individually.

Baseline ... Knowing where to start

Warhammer 40,000 – I've been working on my Space Marine army off and on since 2005. In that time I've continued to build and base coat models for this project without actually finishing anything. I've finished lots of other projects but this pet project is the one that I can never just finish. I think it's probably a subconscious thing as I've told myself this is going to be my go to 40K army (also I set my goal at finishing a company, eventually an entire chapter ... maybe). I'll have my Slaaneshi Daemons as a backup but this is going to be the one army that I will hold onto and use going forward. Which means is I ever finish it I won't have things to build for 40K, silly as it is since new stuff comes out constantly for marines which means I'll always be adding something I think that might be what holds me back.

Anyway the point is to finish this project I need to know where to start. I've tried a few different goals, doing a unit at a time, building a core list etc. None of these have kept me on track, so what's my baseline? Bases of course! When I decided to do a company I went and made little name decals for every marine in my army, these will fit on the little scroll I sculpted on the front of each base. [Interesting fact: the name of each battle brother in my force is based on the genus or species of a bird.] 

My thought is if I finish painting all the bases and put the names on them I'll be motivated to finish up the squads so I can pin them to their final base and seal them with matte varnish. I started the tedious process of painting the bases and realized that I ran out of chestnut ink. Given this army has been in progress for almost a decade I've run into the issue of paints and inks being discontinued. Unfortunately there's not a good GW replacement for Chestnut ink, none of my local stores carry Reaper paints so I had to go to their website and order them direct. This time I'm stocking up with enough to finish the project (just in case).


Tallying the loot ... A post holiday inventory

It's mid-January, the holidays are over and I've finally had a chance to relax. This year the fat man was good to me (as well as my loving family and friends).

Once again I can't extol the virtues of having an Amazon wish list enough, all my family members raved about how easy it was to find that perfect gift with no worries about buying something I'd use in a White Elephant exchange down the road.

Anyway enough pandering and on to the inventory.

By far my favorite gift was a nice leather vest from my wife and kids. My gaming club all have biker style patches with our club name and location on them. Up until now I had a pleather-like nylon vest with a ton of pockets that I had my patches on. While useful for holding things, nylon sucks as it eventually starts to breakdown and crack at the seams. With this nifty leather vest I still have pockets (including some cool hidden holsters, maybe a dice bag will fit in them) a more durable material and a stylish look. 

In the gaming realm I also received some 40k models, magic cards and sleeves and Caverns of Roxor. I'm really looking forward to trying out Roxor as it seems to add a lot to Super Dungeon Explore. I really like the turtles and the other Nintendo homages included in the box. Sodapop really knows how leverage that nostalgia factor.

I also finally took the plunge into BlueRay with the Alien anthology and the Dark Knight trilogy. While I can notice a slight improvement in picture and sound quality I'm not 100% sold on the technology. Sure it's cool to be able to access additional online content and other special features but for most movies I think I'll stick with the cheaper DVDs. Sure some stuff is probably must own for BlueRay like remastered classics and some of the newer 3D films, but for most stuff I just want to watch a movie and don't care if it's in high def or not.

Finally I got the components to build my vacuum chamber and pressure pot. I'm looking forward to the crazy stuff I'll be able to create with these new tools. 

On the painting table ... Dark Angel Command Squad

Warhammer 40,000 – No catchy title today, I'm starting to run out of ideas for these Dark Angels. I started work on a command squad for my Dark Angels commission. Essentially the paint follows the same pattern as the first few batches I did, if you want the details and recipes check that post.

Interestingly enough my client ran out of Dark Angel pads and provided these with a single sword shoulder pad. I believe these are from the Black Templar sprues. He requested I cut in the decals to create a semi 3D shoulder pad. Honestly it was a pain to get the cut right but I think it paid off and looks really sharp.

Now that the new codex is out I'm anticipating several more units to fill out his force.

Off the painting table ... Guild Avatars

Malifaux – I finished up the two Guild Avatars I was working on for a client last night. Overall I'm happy with the way the models turned out. I need to fix my pop-up light box to get better final photos. The iphone is ok for some WIP shots but when it comes to finished models I'm having a hard time getting shots of similar quality as I was able to get with my Cannon Powershot. I suppose the dream of using one device for everything isn't really that feasible. I plan on taking some better shots of these to add to the gallery. Stay tuned for updates.

On the painting table ... Fire Breathing Mexican Dragons

Malifaux – Avatars, love them or hate them they are part of Malifaux. Some are very strong and add much to their original form others not so much. Regardless of how good they are in game the models are all pretty impressive. Whenever I'm running a demo I like to have some of them out next to the table as the inevitably catch the eye of on lookers and lead to a bevy of questions.

While I like to use them most of the time I find myself distracted with trying to meet the manifest requirements and forgetting about my actual in game goals. I imagine with time I'll get better at balancing the two and find a god use for these models.

Anyway on to this weeks project. My Guild client continues to add to his collection and has really found Malifaux to be a game he truely enjoys. Recently he picked up the avatar forms of Sonnia Cridd and Perdita and needs them assembled and painted to match the rest of his force.

Most of the Avatars are difficult to assemble with more finiky pieces and joins that require gap filling. I'm not sure why some of them are partially resin and partially metal as opposed to being made of the same material for all the parts. I assume its a cost savings (however if they were all resin weight would be less of an issue in assembly). 

Once I finished putting theme together I had to go in and do some gap filling. Pretty straightforward simple stuff with no need to resculpt details. A quick shot of primer and I was ready to begin painting. Rather than follow the color on the box I decided to go with a red base for Perdita's mount. I think this takes it into the more demonic looking as opposed to the studio scheme which reminds me of The Neverending Story. Sonia's dragon began with a yellow base and orange wash to bring out the details.

Next steps are to go in and pick out the details. 

On the painting table ... Tank Shock

Warhammer 40,000 – If you can't tell locally the sixth edition rules for 40K have been pretty popular. I'm tandemly working on two separate commission space marine armies. Oddly enough they're both green and share many of the same models. Unfortunately they are two very different shades of green which means I can't assembly line both armies at the same time. 

To speed up the process I pulled the common colors between the two armies and put them in the main slot of my paint table. Then I took two shoebox lids and put the custom mixes and army specific colors into them. That way when I need to change gears I have everything ready to go and can bring up the colors I need right away.

This time around I had to assemble and paint a Rhino and Landraider Redeemer. Both kits a very straightforward and fairly quick to put together. My client has no interest in opening the doors so I was able to glue it shut and skip the fiddly interior details. Once glue together with plastic cement these things are essentially solid bricks.

Painting followed the same rhythm as the other units in the army. Gretchin Green base with a green wash on the bulk of the model. Followed by edge highlights. I used the same grey with black wash for the black doors.

I left the hatches loose so he could upgrade to the melta if he so desired or just stick a standard hatch on if he didn't. I'm pretty happy with how these have turned out so far and just have some minor details to finish up and decals to apply.

On the painting table ... Deathwing Terminators

Warhammer 40,000 – The third batch of my Dark Angel commission consists of 10 Terminators. Five of these are from the Dark Vengeance set and five are thunderhammer close combat terminators. These came to me assembled and "cleaned" for a tabletop quality paintjob. I offer a better price to customers that don't need their models assembled and cleaned up, some clients are good about removing the mold lines others not-so-much. I have to hold back from cleaning them up however (as much as it pains me) otherwise I'd have to charge a higher price to break even.

I based these with Deneb stone and gave an earthshade wash to bring out the detail. From there I went in with Screaming Skull to pick out the edge hightlights and do some basic flat surface highlights. I find this to be a really quick and effective way to paint bone armor. 

The rest of the painting followed suit with the other models in the army. Green base with a green wash to bring out the detail and edge highlights. The gold was painted bronze, earthshade wash and a gold highlight. 

Safe Haven ... Defenses in 40K

Warhammer 40,000 – In sixth edition you are able to buy and bring your own defenses. While I find it slightly odd that two forces could erect a Bastion during the heat of a battle so near to the enemy; it is cool that you're guaranteed being able to use your fancy terrain and be sure you're not caught out in the open.

When Planetstrike was released I looked at the kits and decided to pass. While the rules were fun only a few player in my group at the time had enough models of the right types to field the special army lists for Planet Strike. With the terrain I had at the time it didn't make sense to buy a landing pad, defense lines and bunkers so it was a no go for me.

Now that sixth edition has reinvigorated my groups interest in 40K I decided to look at getting an Imperial Strongpoint. After wining both my Fantasy Football Leagues, my mind was made up to invest in this box of terrain. For about $100 you get two bunkers, 3 defense lines, 3 quad guns, 2 lascannons and 2 comm stations. This is a decent amount of stuff that can cover a pretty solid surface area on a table. 

As always the kits are detailed and easy to assemble. The price is higher than some comparable stuff but fits the aesthetic of the game system better. As with the other GW kits I've put together there isn't a ton of space for models to stand on the terrain, so interaction is fairly limited. Essentially you're paying for a pretty box to take up space on the battlefield. I'm happy with my choice, but others would be less enthused.

Happy New Year!

After a grueling week and a half of holiday parties and celebrations it's nice to sit back take a breath and think about my plans for the new year. 

Bring on the resolutions!

Before I begin, resolutions are typically broken with the first six weeks of the new year. I'm not going to waste time resolving to do things that I'm not going to be able to do. Also I think this list should be five items or less.

ONE: I resolve to improve and expand my line of resin bases. I was lucky enough to get a pressure pot and vacuum pump for Christmas so I plan on refreshing my molds and casting under pressure. This should allow my to be more efficient and have less wasted materials due to bad bubbles. I'd like to add a few more sets to my offerings to really round out what I have. My current sets were just made to fit a personal need for my own models but I've gotten several requests to add some other styles which I think I'll attempt this year.

In the same vein I'm going to recast my ice pillar and flame counters so I can cast them under pressure. I think this may improve the overall look of the clear resin. We'll see how that goes...

TWO: Finish a project before I start a new one. Long time readers can probably attest to my OCD/ADD when it comes to projects. I get an idea in my head and get excited, start something big and then lose interest or start something else halfway through the project. I'm going to make a concerted effort to not do that with my personal projects this year. I can't really help if commissions come through to distract me but with my own stuff until the sealer is dry, I'm not going to start something new.

THREE: Kickstarter, hmmm what can I say. Last year their were a ton of cool projects that came up. I went a little overboard and should be getting a ton of cool stuff in 2013. I suppose it will be a bit like a second Christmas when they finally arrive. (God I hope they arrive before Christmas '13). I resolve to try and avoid backing anything new until my stuff is delivered.

FOUR: Reign in my hobby. It's hard when you do a hobby blog as you feel the need to get everything new and shiny to review and discuss. But really if I don't like something I probably shouldn't review it. I think most hobbyist tend to own more stuff than they can ever possibly use, but I really want to pair down my collections so I'm actually playing with my toys rather than boxing them up.

FIVE: TBD. I said it was a top five so I need to think on this one. Stay tuned for a follow up post once I make up my mind.

Year End Wrap Up - What I did and didn't finish

This is the time of year when everybody and their brother is doing a year end recap. While I could do like every other blogger and talk about the rise of Kickstarter and its impact on gaming, or the move to plastic by many smaller companies, new editons of old favorites and what not; I'm not going to go there. I addressed most of these at some point during the year and if you're really interested in my thoughts on them, please check the calendar on the left of your screen or use the nifty search box.

Instead I'd like to talk about myself (well not really I'm not that self absorbed). This year I've managed to keep up with a fairly sizable amount of hobby projects and I'm pretty impressed with my progress. Given that I have a one year old running around and have to limit my hobby time to when he's sleeping or hanging out with mom I think I did a pretty good job moving these projects forward. Halfway through the year I did this post to recap my personal projects stuck in limbo

Lets see how I did, here are the projects that I planned on finishing:

Downtown Malifaux – Took a back seat to other projects. I have all the components ready to go I just need to glue it all together. I'm hoping to have more progress to share first quarter 2013. Also I still don't have all my models completed yet. I've done a good job getting the Guild models I demo with finished up and have made some progress on my Resurectionists. 

Heldorado – Unfortunately this game hasn't caught on which means little motivation for me to finish this board. Most of my models are painted and there's only a few I need to pick up to be able to play the lists I want. Maybe interest will pick up again when they launch the Kickstarter for the second book. I signed up for their "demo guy program" but honestly there is so little interest in the game locally that I can't get anyone to stock it. Which is a shame because it's really fun. Next on my list of stuff to do for this is to make custom stat cards with ALL the rules for a model on them. Looking up every key word is a pain in the ass, so I figure I could do oversized cards for each model make them easier to read and generally improve upon the aspect of the game I like least.

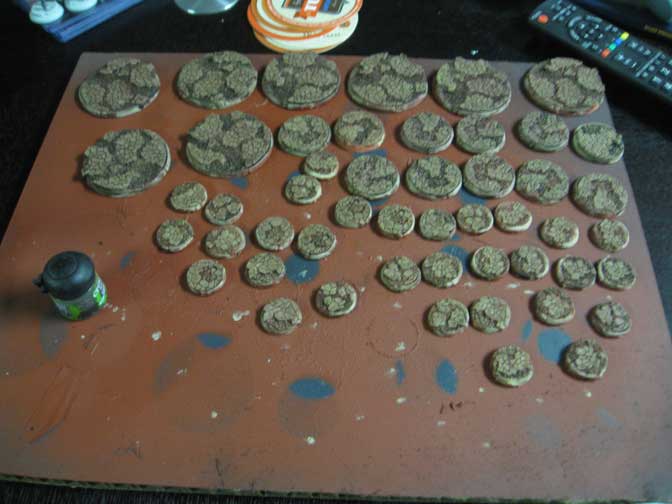
MERCS – I completed Sefadu, Kevar and USCR. My Waza and CCC are nearly complete. I didn't make any progress on the terrain I have planned but this is something I really want to get done. I'm hoping to pick up a few odds and ends that can populate a 2'x3' board with themed terrain. My goal for finishing the dockyards hasn't come to fruition, however friends keep buying up my shipping containers. I want to relook at my mold to see if I can improve upon the joins to simplify the construction of them.

Rogue Trader/Inquisimunda - No progress. This is on the back burner (maybe off the stove for a while). While the RPG is really fun I always felt like I was fighting my players trying to move the story along. I also feel like they had far to many resources to begin the game which meant there was little challenge in any of the beginner scenarios. When I get time maybe I write my own module and move this thing forward again. With the new found interest in space marines I might attempt to run a Deathwatch game next year. Issuing orders might be a way to keep my players on track.

Incursion – Germans are assembled, Allies are yet to be acquired. Only got in three games of this over the course of the year. Hoping to bring it out again in 2013. I'm a little concerned as their forums don't seem to be that active, thinking I need to get those models soon as they might be on the way out. I don't have anything other then a nagging gut feeling to go by, but my gut has served me well in the past.

Relic Knights – While I made good progress on the library at some point I hit the wall and lost my enthusiasm for the project. I imagine it has to do with a combination of the terrible tone of the Sodapop forums and the lack of updates on the Kickstarter project. It was a pleasant surprise to see new beta rules earlier this month, but the lack of updates on the meat and potatos of the game is concerning. I'm hopping when May comes around the models are released without a hitch. Reading through their forums it sounds like Tentacle Bento was held up for quite a while and Caverns of Roxor was delayed as well (seems like a customs issue). Either way I look forward to the game as the playtest rules are tons of fun. Like my dad always says, "Patience is a virtue."

Super Dungeon Explore – Love this game. Almost done painting the base set and hoping to get Roxor soon. My 3D boards need some more detailing to make me happy but I'd count this project as almost complete. I'm looking forward to picking up the expansions next year and adding to my growing cute model collection. 

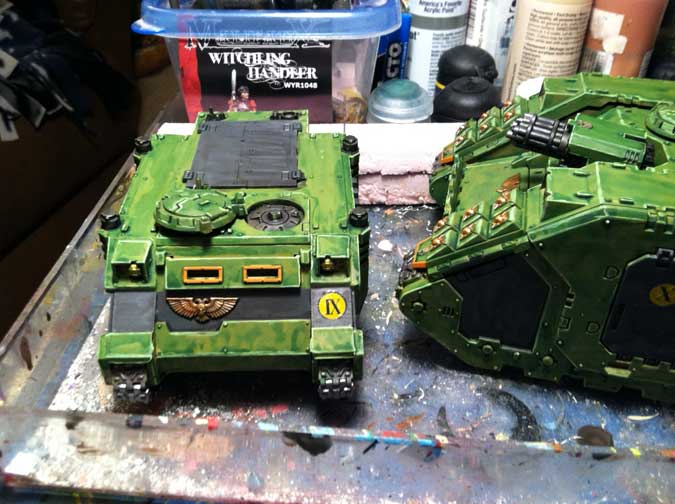
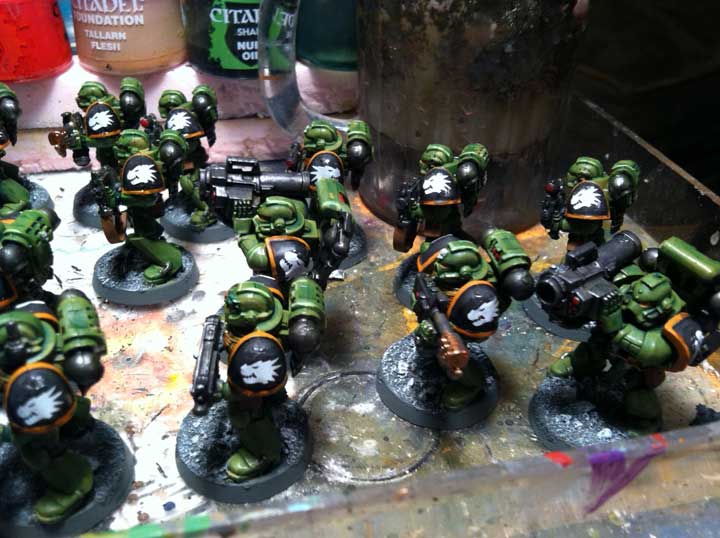
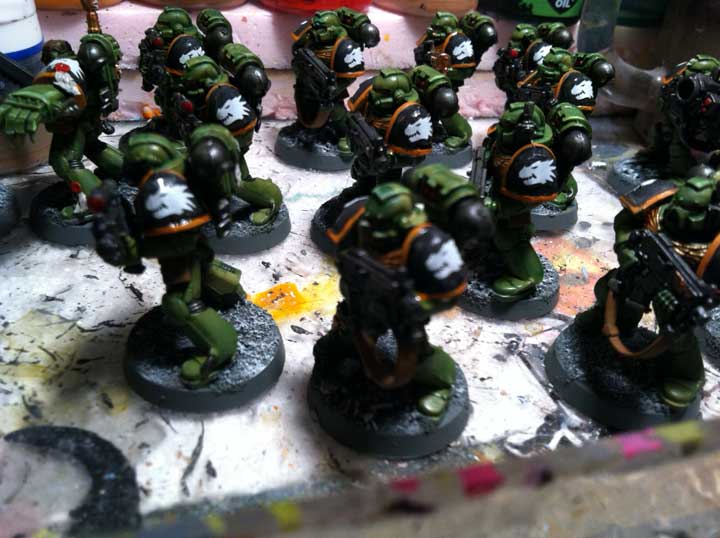
Warhammer 40K Space Marines – I made some big steps toward finishing off my company with a full chapter as the final goal. This is still in progress and I think I'm going to focus on this project for the next few months to get it done. So between commissions this site is going feature a lot of purple power armor at least until I complete the paint on what I already have built.

Warhammer 40K Daemons – Well this is a thing that I like but have little desire to play at the moment. While I'd love to say I'm going to finish this next year it's very unlikely. I do like some of the updated rules but the whole packed with a White Dwarf thing pisses me off. As I don't buy the magazine each month and finding out about an update months later means I can't get a copy for a reasonable price which equates to not having the rules easily accessible. I really wish GW would post these updates to their site so everyone can have easy access to the rules. 

Commissions – 2012 was a huge year for me commission wise. I painted several Warhammer 40K armies, a boatload of Malifaux crews, a few MERCS megacons, and a ton of terrain and game aids. With the  shear amount I had to do I don't feel so bad about not finishing my personal projects. I'm hoping the growing word of mouth advertising at local stores will continue to grow this little side business for me.

Gameroom Cleanout - I'm happy to report that with the exception of several boxes and binders of Magic cards I've successfully found a new home for a ton of hobby stuff that was just taking up space on my shelves. Of course I'm still finding random things I don't want or need anymore so be sure to keep checking that ebay link. Next year I'm going to do a spring cleaning sale with the few items that are still taking up space.


On the painting table ... Super Secret Angels

Warhammer 40K – I received the second batch of Dark Angels the other day and am quite happy to report I was able to paint them up in a single sitting. (Well for the most part) I got all the colors blocked in and the basic washes done. Next up is the edge highlights and the minor detail work. 

These probably look very similar as its the same squad that comes with Dark Vengeance with some minor conversion work on the sergeant. The client has informed me that the next batch with be Deathwing Terminators. I'm looking forward to painting them as it's been a long time since I painted a mostly white (OK fine ... bone) model.

________________________________

On a side note I'm back in the lab casting a boatload more of those LED flame counters. It seems like just when I finish up a big batch they sell out and I get another big order. Thanks again for everyone's patience on these. I think I need to revisit the molds for these to try and make a more efficient way of producing them. 

________________________________

Also Dork Tower has a great strip that everyone should read. Happy Holidays!


Diceless Dice? You gotta have these.

Ok so this Kickstarter thing is pretty crazy. I'm a little bummed about the timing of some of these bigger ones and the wait from kick to product in hand is agonizing. 

That said I came across this little gem. That's right never again will you be caught without dice. Just slip them on and you're good to go. I think having the D6 one with pips would be a classy way to proclaim your gamer pride but the life counter one seems like a must have for MTG players.

I can't wait to come across a 40k player with 20+ rings on their hand trying to spin for rapid fire.

On the Painting Table - Christmas Joy?

Malifaux – I picked up a Reaper Krampus model to use in some holiday scenarios for Malifaux. What's a Krampus? Click here to find out.

To use this as the model represented in the Wyrd scenarios I needed to mount it to a 60mm base. The reaper model is a bit on the small side and looked a little unimpressive on that size base. I decided to use one of my rocky bases and add some undelivered presents to the base. I think this helped to describe the scene and set a tone for the model. 

After basing it up I added some addtional sand and gravel to smooth the transition point where the boxes had been glued to the base. I quick shot of primer and it was ready to paint. Looking on the internet it seems there are several colors that the Krampus typically comes in: black, white or red. I decided to go with the traditional red devil look as I feel that will really stand out against the snow I plan on applying to the base.

Decoding the Cypher – Dark Angels Successor Chapter (sorta)

Warhammer 40k – The commissions just keep rolling in. This time around my client picked up several of the Dark Vengeance boxes to build a marine army. He started out playing Tau and Tyranids however given that most of our group plays some variety of marines he decided that it would be good to have a small marine force to keep on even ground.

Couple that with the really cool fluff about Cypher that rumours say might be rearing his head again and you have motivation to put together a secret fallen themed marine list. Come January I'm guessing he's going to have a bunch more dudes to add when the Dark Angels Codex releases. (mmmm plasma goodness and tons of terminators).

He used the marine painter on Bolter and Chainsword to come up with a pretty cool two color scheme. The top half is black and the bottom is green. I really like when I client provides me good reference material for a job. It keeps us on the same page and means less back and forth regarding basic color choice. (of course I also love when I client says do what you want and loves whatever I come up with). However after some hemming and hawing he decided to stick with the traditional Dark Angels color scheme. 

One of the things he mentioned before turning the models over to me is that he planned on using them as Dark Angels and as whatever marine codex he felt like playing at the time. To accomplish that he did some nifty conversions including building his own "Cypher" model which has enough bitz and do-dads to count as whatever piece of wargear he might want to equip in any game. I personally find this to be a better way of building a multipurpose model. I know some guys love their magnets, but for me they seem to be more trouble than they're worth.

Painting is pretty straightforward. I started with an Orchide base coat and did a Biel-tan green wash. This gave me the basic shading I was looking for on these models. From there I went in and painted the cloaks Denab Stone. The plasma coils and power weapons with Mordheim Blue and then a gun metal and brass color for the metallic parts. I quick wash of Nuln Oil shaded the metallic bits and a sepia wash gave me the shading for the cloaks.

Next step is to pick out the details and edge highlight the models. The client requested tabletop quality so I'm not going to go overboard with the highlighting. The first batch he provided included a tactical squad, librarian, chaplain and two commanders.

The Back Forty K (ok that's not as clever as I thought)

Warhammer 40,000 – It's weird how cylical my gaming group is. We can go weeks without getting together and then jump right back into a weekly routine. I really prefer having a standing night during the week to play as it's less likely to get interrupted by other obligations then events on the weekends.

Anyway we're back into playing 40K and I'm really liking that sixth edition seems to play faster than the previous editions. The allies rules work well for team games especially when they're all imperial armies. Yes I know it's a bit weird to have all imperials fighting each other. 

Last night we played a 3,000 point game with five guys. I paired my 1,500 points  of my Twilight Ravens (Space Sharks this game) with 1,500 points of Drew's Salamanders and we took on 1,000 points each of Dark Angels, Codex Marines and Imperial Guard. For the game we just chose to do three objectives worth 3 points a piece with annihilation being a secondary objective.

Turn one saw two Salamanders dreads and a Twilight Raven dread arriving via droppod. Their goal was to take out the Leman Russ loaded out with Plasma Weapons. Unfortunately they only caused it to loose a few hull points. The guard were able to get a lucky shot and destroy the TR Dread. However the Droppod delivered the locator beacon to a sweet spot for the rest of the pods that would be arriving later.

Tybereous is so cool he and his Red Breathren carved up two squads of Dark Angels, Dark Angels Company Master, an Attack Bike and a Platoon of Guard. I really like using the Carcadons master as a supplement to my shooty force. 

We were able to get in 4 solid turns before reaching our designated end time and essentially all the Dark Angels and Guard were wiped out with a few of the codex marines hiding out in the ruins. I claimed two of the objectives and Drew picked up the other one. 

The game was a ton of fun and moved quicker then I expected, this includes a bunch of looking in the book to reference special rules and look up how things work in this edition. Nice enough there wasn't a single rules argument which either says my group has matured or GW has written a relatively solid rule book.

Leaping Lizards - More Salamanders

Warhammer 40K – Moving forward with a full head of steam sixth edition has several of my painting clients really excited. In particular my friend Drew is loving his Salamanders force. However he has come to the realization that 50%-75% of the games you play in sixth edition 40K are going to be objective based and he needs more troops. (While I pointed out that is some of those fast attach units are scoring he doesn't think they fit with his army theme).

To increase his options he picked up two more squads from Black Reach and asked me to add a power fist and storm bolter to the squad to fill in where he might have points to spend. He didn't want me to spend a ton of time on the conversion so I kept it simple and clipped off the point arm on the sergant and replaced it with a power fist. the other sergant had his hand clipped and rotated so he could hold the storm bolter "nonghettostyle." with plastic models simple swaps like this are easy so loing as you use plastic glue. using the glue to melt the plastic fills in weird joins and creates an incrediblly strong bond.

Painting followed the same scheme as the rest of the army, gretchin green base, green wash etc.

Oretegas finished

Quick update the Ortega crew and associated mercenaries are done. Trying something new and posting from my phone. Bit of a pain to type.

My client loved them and is looking at adding more models to his collection. I'm guessing there will be serveral Guild crews on my painting table in the near future.